Powered by Blogger.

Sip Sip Hooray


Hi friends! Today I'm popping in with a project featuring the new Star Teacher Digi I designed for Sweet 'n Sassy Stamps. My boys have had the most AMAZING teacher this year, and I was inspired to design a few little digis to make some projects for her for Teacher Appreciation Week next week.


I started with the sip, sip hooray sentiment, cutting it out in a tag shape. I took the plain to go cup image and sized it down and copied it for the cup image layering the original sized cup over the top for a little dimension and colored with Copic markers.  The card shape and  pieces and parts are from a die set and I used patterned paper to spice things up.  


For the inside of the card, I wanted to do a gift card to go with the "coffee's on me" part of the sentiment.  So I used the same coffee cozy strip, but only glued it down on the bottom and sides so I could tuck in a Starbucks giftcard.  I then cut down the thanks a latte sentiment from the set and placed it in the center to finish things off.  A super quick and fun card done!


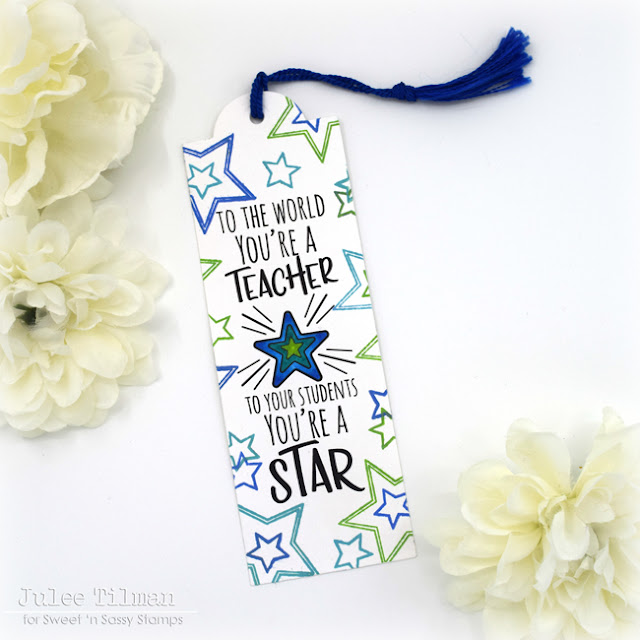
For my second project I wanted to create a bookmark to go along with a book store gift card. I haven't finished up the whole project yet, but the bookmark design is done, minus the laminating.

I lined up the two sentiments and the star image to print, then cut with the Bookmarks & More Die Set.  I then stamped the stars from the Back to School stamp set in blues and greens to fill in the space. Then I handed it off to one of my boys with some Copics to color in the star.  A little tassel finishes things off.


Okay, if you haven't checked out the $10 Deals category in the SNSS shop yet, there are still a few more days to take advantage of the sale!  Lots of goodies, including one of my personal faves, the Coffee Talk set!  Here's a throwback card I made with this fabulous set, on sale for only $10 until April 30.


Compensated affiliate links are used where possible. When you place an order after clicking one of my links, I receive a small commission at no additional cost to you. Thanks so much for using my links and supporting this blog. 💙

Fur-bulous You


How adorable are these sweet kitties from the new Love Your Look set from Sassy & Crafty? It's no secret that I'm a cat lover, and these little kitties totally make me smile.  I colored them up with Copic markers, then hand trimmed to layer onto a galaxy background I created using the new Outer Space Magicals from Lindy's Gang. I hadn't created a galaxy in a while, and this was so much fun.  When it was how I wanted it, I laid out my kitties, then drew lines and dots to form a constellation of fur-bulous kittens!


I added this to a distress oxide background from my stash. I'm still working through all my backgrounds from the Creative Chick workshop I took. This one used peacock feathers and wilted violet distress inks on the top and the same colors in oxides on the bottom.

Thanks so much for stopping by today! Hope you have a great day!

You are Magical


Hi friends! Happy Wednesday! I'm popping in today with a just for fun card with the Mermaid Dreams set I recently ordered from Whimsy Stamps, as part of a prize from the Spring/Summer Coffee Lovers Blog Hop. It's always so much fun to try out new to me stamp companies! I loved this little mermaid tail image and the sentiments in the set are all fabulous, so it just had to hop in my cart, along with a bunch of  adorable gnomes and coffee stamps! {grin} Now to find the time to color them all up!


I colored up the mermaid tail image with Copic markers then fussy cut, doing the same with the little starfish.  I then used a Square Window Tag die cut for the frame, cut from kraft cardstock, and then a gain for the center piece in white. I blended the white inner piece with speckled egg distress ink, then stippled on some white paint for ocean spray onto both pieces of the tag, layering them together to allow the mermaid tail to stick out on top.  I added some seam binding to the top of the tag, then stamped a sentiment from the Mermaid Dreams set on a circele die cut.  I finished off with a distress ink background I had in my stash.

Thanks so much for stopping by today. I hope your day is magical!

Compensated affiliate links are used where possible. When you place an order after clicking one of the product links above or product graphic below, I receive a small commission at no additional cost to you. Thanks so much for using my links and supporting this blog. 💙


Mojo Monday 558


Hi friends! I'm posting a little bit later in the day than planned, but I'm here with a new Mojo Monday sketch! I hope you can find a little time in the next couple weeks to play along with me!

As always, we're playing just for fun. I'm an equal opportunity stamper, so feel free to use any papercrafting products your heart desires and enter as many creations as you like. Use the sketch as inspiration for your creation, then come link it up below so I can come take a look! The linky for this challenge will close on May 2, 2021. I have included dimensions on the graphic later in this post, but feel free to change them up to suit your needs, and never worry about substituting a shape or layer.


I had lots of fun with layers for this sketch, pulling from a pretty Echo Park paper pad.  The darling lamb is from the Sweet Little Lamb set from Sweet 'n Sassy Stamps. I colored it up with Copic markers then die cut with circle dies.  The angled panel is cut from a 4" panel of paper that I marked at 3.5" on one side and 2.25" on the other, then lined up the marks to cut the angle. Super simple but it brings a fun element to the card. After layering up my papers, I stamped the congrats sentiment from Engagement & Wedding Innies on the main panel, then accented with a few pearls to finish things off.

Alrighty, now it's your turn! I hope you've been inspired to create something with this sketch. Thanks so much for stopping by. 


Please join me for Mojo Monday!

Click here to enter
Compensated affiliate links are used where possible. When you place an order after clicking one of my product links above or the set graphics below, I receive a small commission at no additional cost to you. Thanks so much for using my links and supporting this blog. ðŸ’™


Crafty Cat


Hi friends! Today I'm popping in with a fun slimline card with a mash-up of products from Sassy & Crafty.  This sweet kitty was just calling my name to be colored the other day when I was trying out some Arteza alcohol markers.  Definitely not up to Copic standards, but they'll do for what I wanted... an easily portable collection to color with in the backyard or in the car during (hopefully) the boys' tennis lessons this summer. I'm super hopeful that they'll get to participate in activities this summer, as both hubby and I have already had our first dose of the vaccine and cases are trending down in our area. With four asthmatics (five if you count the cat) in the house, we've been very cautious.

Anyhow, you're here for the card, not my babble, so let's do this.  I colored up the cat from the Love in an Envelope Set while enjoying the sun in my backyard.  I hand trimmed around the image, then once I was inside, I started work on the background.  I first stenciled with the Bouncy Path Stencil in purple, then pulled out the Sassy Girls - Crafty set.


I stamped the paint tubes, brushes and pencils randomly in the background, then colored in coordinating colors.  Then I stamped the crafting does count as exercise sentiment on a strip of white cardstock and accented with rhinestones to layer over the card.  Then it was just a matter of gluing things down, popping up the cat image and sentiment on foam tape for dimension.

Thanks so much for stopping by today! I hope you have a fabulous day! 


Grunge Birthday

Sometimes things don't turn out as planned. Sometimes they sit on your desk half finished for months. Then you pick them up again, play, and set them aside again. And then one day you pick it up again and are able to sort the pieces out and make it into something much better than you had thought that little piece of paper would become.  That's the story of this card.


It started out with a gel print from Lydia's Gel Press Workshop in February. Even though I had watched the video only minutes before, I completely forgot the instructions when I sat down to try the technique (not even sure which one it was now), and got them all out of order. The result was a pull that I loved the colors of, but looked nothing like what I was trying to do. So I set it aside and it sat there for a month or so at the top of my backgrounds pile. When I saw the new Script Stencil from Sweet 'n Sassy Stamps, I thought maybe that was just what it needed. So I pulled out some black embellishment mousse and stenciled it on randomly.  It looked fabulous, but needed a little something more. I then pulled out the new Grunge Elements 3 set and added some random stamping in the background.


I then got set on the idea that I wanted to bring out some of those splashes of pink so pulled out Kitsch Flamingo and stamped up the sentiment in that and embossed it, adding it to the card in a circle and embellishing with some pink embossed and cut out stars. It didn't look right. I set it aside for several days.

Then one day I walked in and I thought what about black? I tossed out the pink idea and embossed the sentiment from Everyday Greetings 2 on black cardstock in silver, then added the row of dots as well.  I then tore the edges of the paper, something I haven't done in eons! To tie in some of the black I pulled out the Grunge Elements 3 again and stamped some of the images again in black and embossed with clear.  I finished off with some black soot around the edges and a black mat on a stone card base. Not my favorite card ever, but I'm sure glad I didn't give up on it!

Thanks so much for stopping by today!

Compensated affiliate links are used where possible. When you place an order after clicking one of my links or the set graphics below, I receive a small commission at no additional cost to you. Thanks so much for using my links and supporting this blog. 💙


April 21 Sweet 'n Sassy Stamps Blog Hop + Giveaway


Hi friends! Welcome to the Sweet 'n Sassy Stamps April Release Hop! Hop along with us as we share our projects with the fabulous April release with you. Don't forget to leave a little comment love for the designers linked below (including our brand new team member) for a chance to win a $25 gift voucher to the Sweet 'n Sassy Stamps shop. Winner will be announced on the SNSS blog, Wednesday, April 28.


If you've arrived from Karen's blog, you're right on track! If not, be sure to head over to the start of the hop on the Sweet 'n Sassy Stamps blog for all the info and another card from me! If a link misbehaves along the way head on back there for the full hop list. All right, let's get hopping!


My card today features a few of the new release goodies. The images are from the Mr. & Mrs. Stamp & Die Bundle. I just love these elegant images and colored them up for a happy couple with Copic markers. I then cut with the coordinating dies.

I created the background with the Script Stencil with aqua ink, then embossed a sentiment from the new Everyday Greetings 2 set. A little foam dimension and the front of the card was done.  I love how these images fill out a slimline card so well!


For the inside, I chose a sentiment from the Engagement & Wedding Innies set and stamped it on a square of white cardstock.  I accented with the shoes from the Mr. & Mrs. set, since I thought it went well with the "first step" part of the sentiment.

 Thanks so much for stopping by! There is still a ton of inspiration on the hop, so be sure to click on over to the next stop. 

The next stop on the hop is the fabulous Jane Bosi!


Compensated affiliate links are used where possible. When you place an order after clicking one of my links, I receive a small commission at no additional cost to you. Thanks so much for using my links and supporting this blog. 💙


Chocolate Therapy


There's an awesome new release in the Sassy & Crafty shop today, and while this card doesn't feature any new products, there will definitely be some cards in the future with this month's release.

I've had this Sassy Girls - Sweet stamp set for a while now and decided it needed to be inked up the other day.  I colored her up with Copics, then stamped the sentiment below her.  Isn't that a great sentiment. I have a regular need for chocolate... and coffee!


The background started with white paper which I rubbed with Catherine Pooler ink. I then used the Donut Sprinkle stencil to add the paper glaze sprinkle and then traced the edge of the stencil to fussy cut the drips.  I finished with some patterned paper behind the panel and blended a darker brown ink around the edges for some depth.

Thanks so much for stopping by today! You'll definitely want to go take a peek at the new release! 

Butterfly Background


Hi friends! Today I'm popping in with a couple of cards using the SNSS April Stamp of the Month. This month it's the lovely Butterfly Background set and it's a free gift with a $60 order in the month of April. Just add it to your cart and the discount will automatically apply once your order amount qualifies.


For the first card I created a slimline card, coloring the butterflies quickly with Copic markers, then matting with turquoise cardstock.  I die cut the hope from the Faith & Hope Word Dies several times, stacking a turquoise one on top and gluing together for dimension.  I then coated the word with Versamark ink and embossed with sparkle embossing powder.  I added the choose from Choose Faith above it on a strip of cardstock I had stenciled with the Rise & Shine Stencil, then added a fussy cut  butterfly from the background for accent.  I finished off with a turquoise mat and a border from the Bookmarks & More Die Set.


For the next card, I stamped the Butterfly Background directly on patterned paper, then colored quickly with Copic markers.  I pulled out the Special Blend Stamp & Die Bundle and dstamped the tea cup image onto the same patterned paper, then die cut with the coordinating die.  I added a sentiment strip with a sentiment from Special Blend and another border from the Bookmarks & More Die Set to finish things off.

Thanks so much for stopping by today! I hope you have a wonderful day!

Compensated affiliate links are used where possible. When you place an order after clicking one of my links, I receive a small commission at no additional cost to you. Thanks so much for using my links and supporting this blog. 💙


Purple Sympathy


Hi friends! Today I've got a sympathy card featuring stamps from Reverse Confetti. Are you a purple lover or a purple hater? I remember when I worked for a meeting planning company having grown men and women coming up to me irate that their name badges were purple.  I'd always tell them they were so lucky because purple is the color of royalty. LOL Before that I had no idea how polarizing a color could be.


Anyhow, I went with a purple background I made a while back in a distress ink class.  The vase image is from the Lily of the Valley set and I colored it with Copics and die cut with the coordinating confetti cuts.  The sentiment is from the same set and stamped in abyss onto a Circe Rays Duo confetti cut.  I added a thin black mat to set off my layers and glued everything down.

Thanks so much for stopping by today! I hope you have a lovely day!

Mojo Monday 557


Hi friends! It's Monday and time for a brand new Mojo Monday sketch! I hope you can find a little time in the next couple weeks to play along with me!

As always, we're playing just for fun. I'm an equal opportunity stamper, so feel free to use any papercrafting products your heart desires and enter as many creations as you like. Use the sketch as inspiration for your creation, then come link it up below so I can come take a look! The linky for this challenge will close on April 18, 2021. I have included dimensions on the graphic later in this post, but feel free to change them up to suit your needs, and never worry about substituting a shape or layer.


Today's sketch is a clean and simple one and my card uses the sweet Garden Fairy DIGI from Sweet 'n Sassy Stamps. I colored her with Copic markers, then hand trimmed around the image.  My papers are from the Echo Park April Club kit. I used the Fence & Grass Die set in place of the scallop border, adding the sentiment from the digi set down below and embellishing with a grass die cut with the same paper.

Alrighty, now it's your turn! I hope you've been inspired to create something with this sketch. Thanks so much for stopping by. 

Please join me for Mojo Monday!

Click here to enter
Compensated affiliate links are used where possible. When you place an order after clicking some of my links, I receive a small commission at no additional cost to you. Thanks so much for using my links and supporting this blog. ðŸ’™