Powered by Blogger.
Showing posts with label grunge. Show all posts

Dream Big Crafty Fun


Hi friends! Today I'm participating in an Instagram collaboration hop with some of my crafty friends. We're all using stencils, so there will be a lot of fun inspiration to check out.

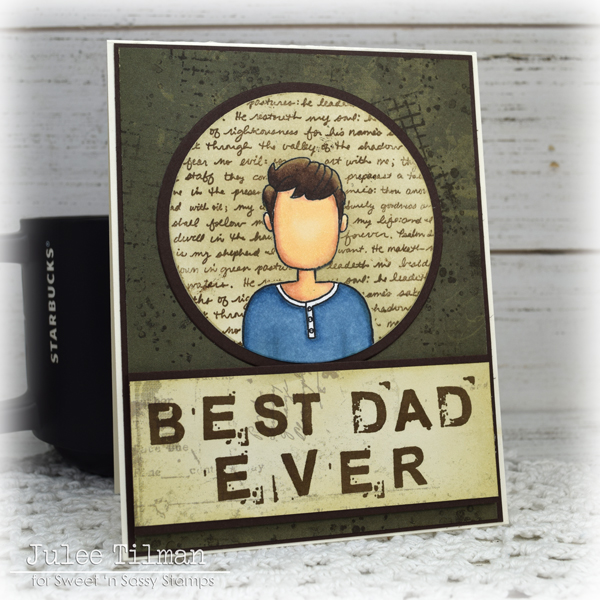
For my background, I pulled out the Diamond Tile Stencil I designed for Sweet 'n Sassy Stamps and did a patina effect using the Patina Technique Kit from Hero Arts. I did it on an ink blended background with various browns, then used the script tile from the Texture Tiles 1 stamp set in both turquoise and brown inks for a texture effect. And of course, I had to add some ink splatters.


The stamped images are from the Forever Loved stamp set I designed for Sweet 'n Sassy Stamps. I colored with Copic markers (mostly greens and browns with a little blue thrown in to make it minty). I then die cut with the coordinating Forever Loved Die Set.

The sentiment is from an older Dream Big Word Die from Erin Lee Creative. I doubled two layers up for dimension, cutting from some rose gold paper.  I added a vellum circle behind it so it didn't get lost in the background, then finished off with some aqua rhinestones and cinnamon stickles for the flower centers.

I hope you have a fantastic day! Thanks for stopping by!

Hello Happy Place


Hi friends! I'm popping in with another fun grunge-y summer vibes card.  I just got back from the ocean, but it's been quite a week so far, so I could use a little more happy place right about now.  My stamps never fail me, though, and the July Sweet 'n Sassy Stamps release was the perfect excuse to craft up my own little happy place.

I started with the images from Summer Vibes, which I colored with Copic markers and then cut with the coordinating Summer Vibes die set.  I love that there's a die for the stamped aloha word! I think it looks fabulous embossed in white on black cardstock. I added a bit of shimmer to the drink and flower stem, but my photography skills didn't seem to capture it very well.


The background is a throw things at it until you like it kind of background.  It was lots of fun.  I started with white cardstock that I had used for a ghost print clean up with the Chicken Wire Stencil and some grey ink.  I then stamped around the edges in grey with the hibiscus flower and inked up the edges with pink and black inks.  I decided I wanted a bit more texture, so I pulled out Texture Tiles 6 and randomly stamped the chicken wire stamp with white pigment ink, then embossed in clear.  I love how it's not that stark white, and a little imperfect.  I then splattered on some black ink and when I was finished I roughed up the edges.  I pulled the happy place sentiment from the Happy Camper set to finish things off.

Thanks so much for stopping by today! I hope you're able to find a moment or two in your happy place, even if it's a paper creation!

Compensated affiliate links are used where possible. When you place an order after clicking one of my links, I receive a small commission at no additional cost to you. Thanks so much for using my links and supporting this blog. 💙

Hibiscus Thanks


Hi friends! I'm popping in today with another fun card featuring the July release from Sweet 'n Sassy Stamps.


I started with a card panel gel printed with distress inks in a rainbow of colors.  I then stamped it with the different Texture Tiles 6 stamps, trying to keep it tone on tone as the colors changed.  I then did the same thing over the top with the Paint Splatters stencil.

Next I stamped the hibiscus flower from Summer Vibes multiple times across a panel of white cardstock.  I cut a center portion out of the rainbow panel on the diagonal, then lined it up to allow the hibiscus to show through the back side.  To finish off I added a black mat to the whole panel, then stamped one of the thank you's from the July Stamp of the Month set, Thank You.

Thanks so much for stopping by today! I hope you have a wonderful weekend!

Compensated affiliate links are used where possible. When you place an order after clicking one of my links, I receive a small commission at no additional cost to you. Thanks so much for using my links and supporting this blog. 💙

Aloha Grunge


Hi friends! I'm popping in today with a little summer vibes grunge. I love the stencils at Sweet 'n Sassy this month, and couldn't wait to layer the Chicken Wire and Paint Splatters together for a fun background.


The flowers and sentiment are from the new Summer Vibes set and cut with the coordinating Summer Vibes dies. I colored them up with Zig markers, then accented a bit with stickles and grunged up the edges. Easy peasy.

Thanks so much for stopping by today!

Compensated affiliate links are used where possible. When you place an order after clicking one of my links, I receive a small commission at no additional cost to you. Thanks so much for using my links and supporting this blog. 💙

Grunge Birthday

Sometimes things don't turn out as planned. Sometimes they sit on your desk half finished for months. Then you pick them up again, play, and set them aside again. And then one day you pick it up again and are able to sort the pieces out and make it into something much better than you had thought that little piece of paper would become.  That's the story of this card.


It started out with a gel print from Lydia's Gel Press Workshop in February. Even though I had watched the video only minutes before, I completely forgot the instructions when I sat down to try the technique (not even sure which one it was now), and got them all out of order. The result was a pull that I loved the colors of, but looked nothing like what I was trying to do. So I set it aside and it sat there for a month or so at the top of my backgrounds pile. When I saw the new Script Stencil from Sweet 'n Sassy Stamps, I thought maybe that was just what it needed. So I pulled out some black embellishment mousse and stenciled it on randomly.  It looked fabulous, but needed a little something more. I then pulled out the new Grunge Elements 3 set and added some random stamping in the background.


I then got set on the idea that I wanted to bring out some of those splashes of pink so pulled out Kitsch Flamingo and stamped up the sentiment in that and embossed it, adding it to the card in a circle and embellishing with some pink embossed and cut out stars. It didn't look right. I set it aside for several days.

Then one day I walked in and I thought what about black? I tossed out the pink idea and embossed the sentiment from Everyday Greetings 2 on black cardstock in silver, then added the row of dots as well.  I then tore the edges of the paper, something I haven't done in eons! To tie in some of the black I pulled out the Grunge Elements 3 again and stamped some of the images again in black and embossed with clear.  I finished off with some black soot around the edges and a black mat on a stone card base. Not my favorite card ever, but I'm sure glad I didn't give up on it!

Thanks so much for stopping by today!

Compensated affiliate links are used where possible. When you place an order after clicking one of my links or the set graphics below, I receive a small commission at no additional cost to you. Thanks so much for using my links and supporting this blog. 💙


Grunge Florals


Hi friends! It's a brand new month and that means there's a fantastic new release in the Sweet 'n Sassy Stamps shop today.  It's a huge one with stamps, stencils, and dies!


I am head over heels for the new Alleluia Lilies set.  This big florals are just gorgeous!  I colored with distress oxides and cut with the coordinating Alleluia Lilies Die Set, adding some accents with Copics and some stickles.

The background is done with distress oxides and the new Grunge Dots Stencil. This stencil is totally up my alley, and I guarantee you'll be seeing a lot of it!  The sentiment is from the previously released In This Together set.  I just love this sentiment.

Thanks so much for stopping by today! I hope you have a fabulously creative start to your month. Be sure to head over to Sweet 'n Sassy Stamps to see the whole release.

And don't miss the February inspiration challenge in the SNSS VIP Group on Facebook.


Compensated affiliate links are used where possible. When you place an order after clicking one of my links, I receive a small commission at no additional cost to you. Thanks so much for using my links and supporting this blog. 💙

Hi


Hi friends! Today I'm popping in with a grungy little bit of fun I worked on recently. Sometimes getting my fingers all stained with ink is the best therapy!

This card started with Marilyn Red Atelier ink.  I smooshed it onto a palette to grab a little ink with my waterbrush to color the sweet flowers from the Flower Garden set.  Used to my well used ink pads, I presssed quite heavily and came up with a whole lot of ink on my palette. It was the perfect excuse to start smooshing up a background. {grin}


So I dabbed a piece of acetate into the pool of red ink, then spritzed with water and smooshed onto heavy white cardstock a few times. I added in some texture with stamps from the Texture Tiles 1 and Grunge Elements 2 stamped in hickory smoke distress oxide.  I used a bit of the Paint it Black Atelier ink to add in some darker accents and also to edge around the sentiment panel.

The sentiment shape is a tag from Park Lane that I also smooshed with the watered down Marilyn Red ink, and then stamped with the County Fair Alpha in black.  I added the colored and hand trimmed flower spray to this tag with a bit of twine and a rhinestone.  The rectangle frame behind was from a previous mixed-media project where I cut frames from chipboard with rectangle dies, then coated with versamark and embossed with white embossing powder.  Ifinished off with some distressed edges and ink splatters.

Thanks so much for stopping by today! I hope you have a fabulous day!

Compensated affiliate links are used where possible. When you place an order after clicking one of my links, I receive a small commission at no additional cost to you. Thanks so much for using my links and supporting this blog. 💙

Brotherly Love

Hi friends! How y'all doing this fine Friday? With Father's Day, (which also happens to land on my Father-in-law's birthday) coming up in a few weeks, I've had masculine cards on the brain.

Father's Day Card by Julee Tilman

I know a lot of people struggle with masculine cards, but I really like making them. Probably because I really like grunge... and a break from my usual overly embellished creations.  

The first card I'm sharing today started by building up the image from Brotherly Love, then masking it off and overstamping with the Psalm 23 Background on designer paper.  I then colored the image with Copics and cut with a circle die.

Father's day card by Julee Tilman

The sentiment is created with the Messy Stamped Alpha and stamped directly on a piece of the same designer paper. I then chose another piece of designer paper for the background and grunged it up with stamps from the Texture Tiles 1 set.  I added a bit of sponging to all my panels, then finished off with dark brown mats and adhered to an A2 card base.

Masculine card by Julee Tilman

Next up, I stepped out of my grunge comfort zone and went for a more clean and simple look. I built the image, this time adding in glasses, a nose, and a mouth, then colored with Copic markers. I die cut this panel in a square and sponged tumbled glass distress oxide around the edges.  The thinking of you sentiment is from the Sentimental Mash-up set.  I then stamped a few sentiments from Sentimental Wordfetti, and embossed them in white on black cardstock to add my "thoughts" to the thinking of you card.


Thanks so much for stopping by today! I hope you have a fabulous weekend!

Compensated affiliate links are used where possible. When you place an order after clicking one of my links, I receive a small commission at no additional cost to you. Thanks so much for using my links and supporting this blog. 💙

Congrats


Hi friends! Today I'm popping in with a quick little congrats card.

I started out stamping the sweet balloons from Birthday Borders and coloring with Copic markers. I fussy cut around just the balloon shapes.  Next I grabbed a panel of cardstock and stamped the confetti stamp repeatedly down the panel in rainbow colors.  When this was done, I doodled a little border around the edges, then decided where I wanted my balloons and drew strings down to the center with a black pen.  After I glued the balloons down, I decided to go around them with a black marker, and made a little boo boo on the yellow balloon. I attempted to lighten it up and fix it, but the damage was done.  The only thing to do was to bring on the grunge! LOL


I scraped a bit of white gesso over the stamped confetti to soften the background, then sponged on some black soot ink and splattered lots of ink as well.  The sentiment is from Sentimental Mash-up and I embossed it in black with sparkle embossing powder on vellum, then attached it to the sides of my panel with a bit of washi tape.  I added a seam binding bow where my balloon strings were gathered, then finished off with a polka dot embossed background.

Thanks so much for stopping by today! I hope you have a fabulous day!

Compensated affiliate links are used where possible. When you place an order after clicking one of my links, I receive a small commission at no additional cost to you. Thanks so much for using my links and supporting this blogIt is so very appreciated! ðŸ’™