Powered by Blogger.
Showing posts with label Arteza. Show all posts

August My Monthly Hero Release Hop + Giveaway

Hi friends! Today I'm so honored and super excited to be joining the August My Monthly Hero Release Hop with Hero Arts. If you've been hopping along and arrived from the delightful blog of Jessica Frost-Ballas, you're all set. If you're just tuning in, you can keep hopping from here or head on over to the Hero Arts blog to start from the beginning. There's a fabulous giveaway prize of the main kit for one lucky commenter, so you're going to want to hop along and shout out some love to all of these fabulous artists. The giveaway closes Sunday, August 12th at 11:59pm, and the winner will be announced the following week.

I must say when I sat down to create with these adorable stamps that I was feeling a little bit lost being on the designer end of a release and a bit nervous to be joining this list of talented artists. Mark quietly calmed my fears by saying, "Just do YOU." Such good advice for us all, and I'm pretty sure I need a stamp (and a wall-sized poster) of that saying to remind me of this on a daily basis! So here I am, just doing ME. I hope you're inspired (and have a cuppa something fabulous at your side, since this is going to be a long post)!

Once I started creating, I just couldn't stop, wanting to try a variety of ideas with some of the optional add-ons for this month's kit. My first idea was a shabby chic card centered around the beautiful Tea Party Fancy Die. I grabbed some papers from the Santorini collection and cut the die and the oval frame, from one pattern and just the oval from another. I added some shading to the edges with distress oxide inks, then added accents with the Crystal Clear Laquer Pen to the window frame and the tea set up. This pen is my handy dandy new best friend. I *just might* have went a little cray-cray with the glitter because I loved working with this pen so much!


Next up I added some lace trim to around the edge of the oval with red line tape and popped this layer up on foam tape.  The background is another design from the Santorini line, sponged with distress oxides.  The stamped flowers and sentiment are from the darling Spill the Tea stamp set and cut with the coordinating Spill the Tea Frame Cuts. I colored them with copics, then coated them with the Crystal Clear Laquer Pen and sprinkled some glitter on. I did the centers first, with a latte colored glitter, then the petals with a diamond glitter. May have sprinkled a bit much, but you can never have too much glitter, right?


I finished with a few more glitter accents on the designer paper, then added in a chipboard bird, some paper flowers and a seam binding bow to complete the shabby chic look. I love how this turned out and have an idea to make some shabby chic ornaments for Christmas gifts with this die set. Can't wait to give it a go.


For my second card, I couldn't wait to ink up the lovely Mocha Maiden! Isn't she something? Definitely not how I look drinking my morning coffee, but maybe an accurate portrait of how it makes me feel! Haha! She's stamped in Intense Black Ink and colored with Arteza real brush pens and a wink of stella clear glitter pen. I had another heyday using that Crystal Clear Laquer Pen and sprinkled glitter, because a diva should sparkle wherever she goes, right?


For the layout I used the oval from the Tea Party Fancy Die to cut the image as well as an offset black mat. The background is the super cool Distressed Tile Bold Prints background stamp, embossed with White Puff Embossing Powder. I can see myself using this background a lot, and with the white puff embossing it has so much texture!  I blended some distress oxides over the embossing and then buffed with a baby wipe for a nice resist. I figured this diva surely was a sweety, so selected the punny sentiment from the Spill the Tea stamp set and a few rhinestones to finish things off.


Next up is the adorable kitten in a cup from the Kit-Tea Stamp & Cut. How purrr-fect is she? Once the boys are back in school, we're going to get a cat again and I just can't wait to meet my new little companion! I stamped her in Intense Black Ink and colored with Arteza real brush pens and a wink of stella glitter pen. Once I cut her out with the coordinating die, I decided the cup was looking a little plain, so stamped some of the flowers from the set. Then I used that Crystal Clear Laquer Pen again to coat the flowers.


While this was drying, I decided to play with some alcohol inks, so made a little background with a variety of blues, greens and a gold mixative. At this point, I decided the flowers on the cup needed to bring in some of the turquoise from the background, so I colored the dried lacquer with Copic markers and then highlighted the centers with a drop of white nuvo drops. I finished off with a sweet little sentiment from the set.


My final card today uses the gorgeous teacup from the Spill the Tea stamp set and coordinating Spill the Tea Frame Cuts. I stamped in Intense Black Ink and watercolored with distress inks. I spent a lot of time getting just the right look on the roses, then decided to add some accents with that Crystal Clear Laquer Pen and lost a lot of the highlights. Oops!


For the background I embossed the Floral Doily Bold Prints background stamp with White Puff Embossing Powder and then blended with distress inks and buffed with a baby wipe. I love the effect! I selected the come oolong sentiment from the same set, cut with a circle and finished off with some black accents and a little stamped and die cut leaf with pearls.

Alrighty! If you're still with me, you deserve a high five! ✋ Thanks so much for hanging out with me as a I shared these cards.  I hope you found a little inspiration for these delightful optional add-ons.  The August Main Kit is absolutely fabulous and if you're a coffee lover like me, you NEED it! Be sure to snatch one up before they're gone! I can't wait to hop along and see what all these fabulous artists created with the kit!
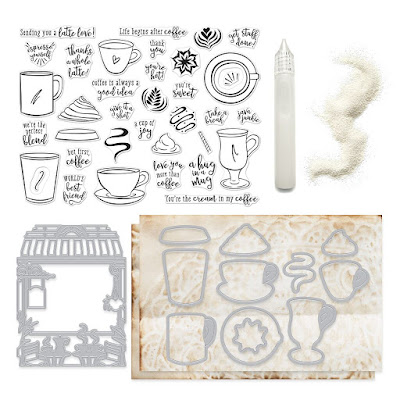
August 2018 My Monthly Hero Kit

August 2018 Optional Add-Ons
If you haven't heard of My Monthly Hero, they release a new kit and optional add-ons the first Monday of each month. The kit is available for a limited time to non-subscribers and once it's sold out it's gone for good. You can also subscribe to the kit so you never miss one.

Alrighty, your next stop for inspiration is Kelly Latevola. Check out the entire hop list below. Happy hopping!


Affiliate links are used on this blog, at no extra cost to you. Thank you for supporting me, and clicking on my links to shop!


Hero Arts - My Monthly Hero August...
[ HA ]
Hero Arts Get Them All August Add-Ons
[ HA ]
Hero Arts Tea Party Fancy Die
[ HA ]
Hero Arts Spill the Tea Stamp Set
[ HA ]
Hero Arts Spill The Tea Frame Cuts
[ HA ]
Hero Arts Mocha Maiden
[ HA ]
Hero Arts Distressed Tile Bold Prints
[ HA ]
Hero Arts Kit-Tea Stamp & Cut
[ HA ]
Hero Arts Floral Doily Bold Prints
[ HA ]
NK350 Crystal Clear Lacquer Pen -...
[ HA ]
PW121 White Puff - Hero Arts
[ HA ]
MT100 Original MISTI Laser Etched...
[ HA ]
Ranger Ink - Antique Linen Distress...
[ SBC ]
Ranger Ink - Tea Dye Distress Oxide
[ SBC ]
Ranger Ink - Ground Espresso Distress...
[ SBC ]
Prima Santorini 8x8 Paper Pad
[ SBC ]
Ranger Ink - Wilted Violet Distress...
[ SBC ]
Ranger Ink - Shaded Lilac Distress Oxide
[ SBC ]
Ranger Ink - Dusty Concord Distress...
[ SBC ]
Canson XL Series Bristol Pad, 9"X12"...
[ AMZUS ]
Tsukineko - VersaMark Watermark Ink...
[ SBC ]
Arteza Real Brush Pens, 96 Paint...
[ AMZUS ]
ZIG - Memory System - Wink Of Stella...
[ SBC ]
Ranger Ink - Tim Holtz - Alcohol Ink...
[ SBC ]
Ranger Ink - Tim Holtz - Adirondack...
[ SBC ]
Ranger Ink - Alcohol Ink - Citrus
[ SBC ]
Ranger Ink - Alcohol Ink - Pool
[ SBC ]
Ranger Ink - Alcohol Ink -Mermaid
[ SBC ]
Ranger Ink - Alcohol Ink - Limeade
[ AMZUS ]
Jacquard - Pinata Alcohol Inks - Rich...
[ AMZUS ]
Nuvo Crystal Drops - Gloss White
[ SBC ]
Ranger Ink - Distress Ink Mini -...
[ SBC ]
Ranger Ink - Distress Ink Mini -...
[ SBC ]
Ranger Ink - Distress Ink Mini -...
[ SBC ]
Ranger Ink - Distress Ink Mini -...
[ SBC ]

Enjoy Your Day

Hi friends! How has life been treating you? I've been staying busy, but not creating very much lately. First off, I decided to start the much overdue reorganization of my studio. My first stage was just to get the things I use most or want to use most within reach and get myself a clean area to create in by my birthday. I managed to finish up the first stage the day before my birthday. Woohoo! It's actually so clean I don't want to get it dirty!  LOL  There's still a lot to go as the closet in that room is filled to the brim with craft supplies, as well as the extra closet in the boys' bathroom and part of the closet in my old office. But for now, I'm happy to pretend those closets aren't there and create in my newly organized space.


For my birthday and a delayed 20th anniversary trip, Mark and I took a little vacation to Park City, Utah without the boys last week. It was fun to unwind and sleep when I wanted to! {grin} In preparation for the trip, I had picked up a few magazines at Barnes & Noble when they had a 33% off magazines promotion. I've never purchased a magazine that includes free stamps before, and didn't have high expectations, but was curious so picked up the Simply Cards & Papercraft 178 edition with The Best of Cardmaking Magic by Christina Griffiths set as the free gift. Pretty cute stamps and a fun magazine to flip through on a road trip.

So yesterday, I pulled the set out, wanting to give it a try. The stamps were INCREDIBLY hard to peel off the backing, and the bases are so thin that I envisioned having to ink and reink on the MISTI about 500 times to get a good impression. I was pretty shocked when the stamps inked beautifully the first time and I didn't have to reink any of the images. I also tried Versafine Clair nocturne ink with them, so the magic might have been due to the ink pad. I've never tried this ink before, but I'm totally smitten!

I stamped the leaves a few times and two of the flower images on smooth bristol and then colored with Arteza real brush pens and a wink of stella clear glitter pen.  I cut just the flower center from one of the flowers and popped it up on dimensionals in the center of the other flower, then fussy cut the large flower and all the leaves.


The pink strip in the background is done with distress oxides in spun sugar and worn lipstick.  For accent, I added two strips of black cardstock across the bottom, adding some white gel pen lines to the bottom one.  The sentiment is stamped on white cardstock, then framed with a chipboard piece I made by taping two pierced square dies together and die cutting the frame. I glued layers of the diecut chipboard frames together and then embossed the frame with Versamark ink and white embossing powder.

I finished off with a few pink pearls and some white gel pen accents on the flower. All in all, a super fun return to my studio!

Thanks so much for stopping by today! I hope you have a fabulous day!

Enabler's List 


Stamps: The Best of Cardmaking Magic by Christina Griffiths (Simply Cards & Papercraft)
Paper: Smooth Bristol (Canson), lightweight chipboard
Ink: worn lipstick and spun sugar distress oxide (Ranger), Versafine Clair Nocturne, Versamark (Tsukineko), Wink of Stella Clear Glitter Pen (Zig), White gel pen (Signo), Real Brush Pens (Arteza),
Accessories: Pierced Squares Stax Dienamics (My Favorite Things - they don't seem to be in their store anywhere, so might be discontinued, but I did find them on Amazon), white embossing powder (Judikins), adhesive pearls

You Got This

Hi friends! I'm popping in today with probably the most "mailable" card I've made in a long, long time. Haha. Absolutely no dimensional tape was used in the making of this card! I love me some dimension with all the bells and whistles, but also admire and desperately hope to get better at a cleaner style, too. Sometimes it's enough to let the ink and paper do the talking, right?


This card started out with a little experimentation. After watching Tiffany's Arteza video review, I recently purchased the 96 count Arteza real color brush pens. I've been using my Zig clean color markers more lately, but was feeling very limited in the 36 colors I had. Not long after I watched the video, Amazon had a lightning deal on the Artezas for $60 and I just had to get them. With some rewards I had been saving for a rainy day, it brought my out of pocket cost to just $13, so it was a no brainer to give them a go. Here they are all swatched out with a water brush. 💓💛💚💙💜


My first attempt coloring with them was less than stellar. Once I realized I had printed on regular cardstock and not the smooth bristol, I knew what the problem was and had to give them another go.  Here I used a butterfly from the Lifted Hope printable that's free with the purchase of our Lifted Hope Die Set and colored with pinks and purples. Side note: if you've already purched this die set and would like the printable, just email me at info at vervestamps dot com and I'll send the link.   Okay, on with the art stuff... I will say that the results with the Zig brush pens is a tiny bit better. They seem to stay wet a little longer and one color blends with wet medium are better than with the Artezas. But the Artezas do blend well with each other and with water, so I found myself blending dark to light and then using the wink of stella pen to soften. The brush tips aren't quite as nice and I've had to snip a few stray hairs, but overall I'm really happy with my rainbow of new markers!


Once my butterfly was colored and cut, I wanted a fun background, so took the pens I had colored with and scribbled onto an acrylic block to do a watercolor background. I taped off a rectangle of watercolor paper, then started plopping on color with a large very wet brush. It was quite a bit of fun, but I wanted just a bit more vibrance so I plopped in just a touch of crushed grape dylusions spray at the end and love how it turned out.  Once it was dry, I flicked on some dylusions white paint and a bit of my leftover ink.

I had intended to use the sentiment from the printable, but couldn't bring myself to cover up that pretty background. So I reached for the brand new Coffee Talk 2 set I just picked up from Lil' Inkers Designs. It's got lots of fabulous coffee themed sentiments, but I went for the "you got this" sentiment, as it's been my mantra these past few weeks as I'm working towards the final days of Verve.  I've got another fun thing in the works with the Hope sentiment and that other butterfly, though! Just need to photograph it. 


Thanks so much for stopping by today! I hope you've found a bit of inspiration here and have a fabulously creative rest of your day.

Enabler's List
Stamps: Coffee Talk 2 (Lil' Inkers Designs), Hope Printable (Verve)
Paper: smooth bristol, watercolor paper (Canson), basic black
Ink: laser printer, intense black (Hero Arts), Real brush pens (Arteza - Amazon affiliate link), Crushed Grape spray, white linen paint (Dylusions/Ranger), Wink of Stella clear glitter pen (Zig)
Accessories: Lifted Hope Die Set  (A Cut Above by VERVE)