Powered by Blogger.

National Coffee Day and a Video


Hi friends! Happy National Coffee Day. If you've been around the blog a while you might know that I am a mega coffee lover. I take a dark roast drip, or a 4 shot Americano, black. So good! In honor of National Coffee Day, I thought I'd create a coffee themed card, as well as a video.

I signed up to be in a video hop next month, and I'm trying to get back into the swing of creating videos. This one shows me coloring the image as well as putting the card together. You can watch it here, or on YouTube.

Today I'm using the products in the Not 2 Shabby Jr. Box of the Month for September. The theme is coffee and books, and as an avid reader and coffee lover, I just had to order it!

The focal image is from the Be Cozy stamp set and I colored it up in colors to match the pretty paper in the #coffeeandbooks paper pad. Navy and coral are so pretty together, and I thought a hint of brown made for a nice cozy fall color palette. If you like the colors too, the maker colors I use are listed below.

Blues: B4.6 and B4.3 (OLO), B21 and B99 (Copic)
Corals: R00, R21, R20 (Copic)
Browns: E43, E42, E41, E40 (Copic)


I love that the #coffeeandbooks paper has some solid prints in it to coordinated with the printed papers. It brings so many options for matting. Here I used the pink paper to matt the floral paper, laying it down diagonally on the plaid background and cutting off the excess for an edge to edge diagonal look. I think diagonals are so striking.

For the layout, I decided to do a little collage with the stamped image, a sentiment from the Books & Coffee stamp set and a piece of the #coffeeandbooks ephemera. I added a paper doily from my stash and finished off with a few sparkle enamel dots. I had to add some rose colored reading glasses to the top of the sentiment, since as I'm getting a bit older readers are a must!

That's it for today. If this box is a must have for you, it's almost gone for the month as they reveal a new box on the 1st of each month, so you'll want to hurry. The #coffeeandbooks paper and ephemera are available individually right now, though.

Thanks so much for stopping by today! I hope you have a fabulous National Coffee Day!

Pretty Pumpkins


Hi friends! Today I'm popping in with a fairyland fall scene featuring the Pretty Pumpkins stamp set from Not 2 Shabby. This collection totally has my head in the clouds in a fairy tale imagining a lovely field of pretty pastel colored pumpkins.


I took my color inspiration from the gorgeous Delicate Pumpkins paper pad, coloring the stamped pumpkin image in pinks and dusty blues. I used a couple of cut outs from the Delicate Pumpkins Ephemera Pack as a backdrop, then layered my papers and images together, adding a bit of silver accent.  I added lots of stickles to the images and added some silver ribbon and the Fall Collection Sparkle Enamel Dots to finish things off.

Thanks so much for stopping by today! Have a fabulous day!


Christmas Sentiments Three Ways


Hi friends! Today I'm popping in to share a bit of inspiration with the new Christmas Sentiments set from Sweet 'n Sassy Stamps.

For this card I started with a background I had created previously with a clean up print  using the Peppermint Stripe Stencil. I then stamped the large flower from Poinsettia Greetings on the panel and on some white cardstock.


 I colored the white cardstock image with alcohol markers then fussy cut along the edge and attached to the striped panel and cut off the excess. The sentiment was then embossed in black in the corner and I finished off with a red mat and some sparkly enamel dots.


My second card today pairs the fun Christmas Cookies set with a sentiment from the Christmas Sentiments set. I colored the images with Alcohol markers and then cut them out. The sentiment frame is from the Decorative Frames set and cut with the coordinating dies. I colored it in with alcohol markers, then embossed the sentiment in white and used a white paint pen to add some "snow".  Papers were from my stash and I finished with a little green striped bow.


My third card uses the Peppermint Stripe Stencil over a watercolored background.  I embossed the sentiment in rose gold, then added a candy cane image from my Holiday Cheer set.

Thanks so much for stopping by today! I hope you have a fabulous day!

Jaded Blossom Monster Mini Release and a Video


Hi crafty friends! I'm excited today because there's a monster-ific new mini release at Jaded BlossomWe have four new items available in the Jaded Blossom shop! Check them all out later in this post. 


I've also uploaded my first YouTube video in almost 3 years. My boys and I have been talking a lot about homework and work ethic lately. Mainly about perfectionism, which they got a double dose of from their Dad and me. I’ve been stressing the importance of getting something turned in rather than waiting for the assignment to be perfect to turn it in. And hand in hand with that, to not let the fear of failing stop them from starting. So here I am putting my words into action with my thing I keep waiting for the stars to align in perfect formation before I start. 

I have two fun projects to share with you today, but first I'll get to the one with the video. I created this sweet monster gnome with the new Gnome Dies: Monster Add Ons 1 set. Most of the pieces are cut from colored or white cardstock and then ink blended.  Once he was done, I decided he needed a spooky background. That's where the video starts and you can watch me create it using Distress Heavyweight cardstock and Distress Oxide inks.  Feel free to watch it here on the blog or over on YouTube.


I created the background using squeezed lemonade, mustard seed, shaded lilac, dusty concord, villainous potion, and black soot distress oxide inks.  I made a circle die cut mask from a full stick post it note about the same size as the moon on the Enchanted Night Stencil Pack (this was the freebie with purchase for our release earlier this month), then got to blending.  I added the bat stencil from the same pack over it.  The hope your Halloween is monsterific sentiment is from the previously released Monster Munchies set and I embossed it in white on vellum cardstock. Then it was just a matter of popping my gnomie up on foam dots and then adding to an A2 card base.


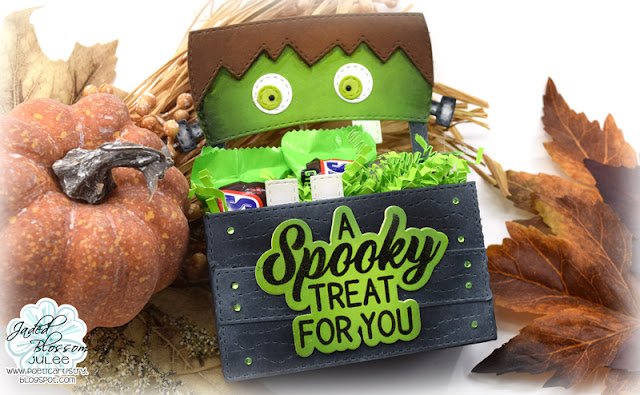
My next project is so exciting. Since the Build a Booth concept came out, I've been wishing for a little treat box die to go with it.  It's finally here with this release and it's fantastic!  For this project, I started by creating my booth using the base Build a Booth Die and the NEW Build A Booth Dies: Monster Add Ons. Frankie was so fun to create!  I wanted to make it look like he was eating the treats, so decided to put my treat box in the front instead of behind.  It works great either way!  I used the Build a Booth pieces to decorate the new Build a Booth: Treat Box Add Ons, then glued it all together and added two of Frankie's teeth to the inside front of the box.


The sentiment is from the previously released Large Halloween Treats stamp set and cut with the coordinating outline dies. I finished off with a few teeny gems for the nails in the booth.

Okay, now let's take a look-see at the whole release...


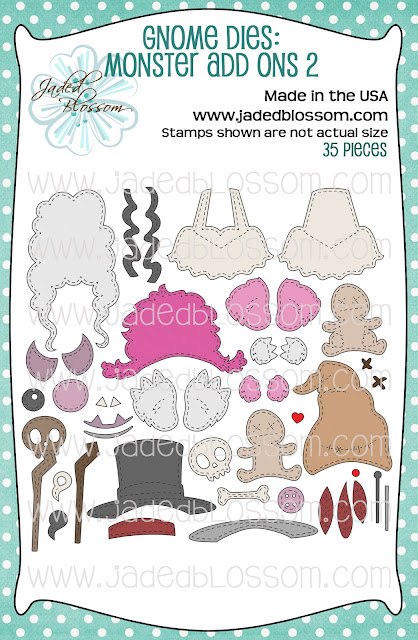
Gnome Dies Monster Add Ons 2 $33.99

Build a Booth Monster Add Ons $21.99

Build a Booth Treat Box Add Ons $19.99


Thanks so much for checking out my projects! 


Make sure to check out all the design team projects by clicking on their names below.

Let's Be Frank


 Hi crafty friends! Today I'm popping in with a little caffeinated inspiration for you featuring the Halloween Hisses stamp set. If you've been around a while, you might know that I'm a coffee lover through and through/. So when I had a hankering to color and test out some new markers that just arrived I couldn't pass up the chance to color this franken-mug image.

I stamped him with Memento ink, then colored with Olo alcohol markers. I had a lot of fun adding some stubble accents and flecks to his eyes. Next I layered up some paper scraps, matting with a chocolate cardstock.  The sentiment is stamped onto a rectangle from the Card Mat Dies. I finished off with a green puffy heart, then added a little bit of stitching accents to my horizontal strip.

Hope this inspires and you have a fantastically creative day!


Gingerbread Girl


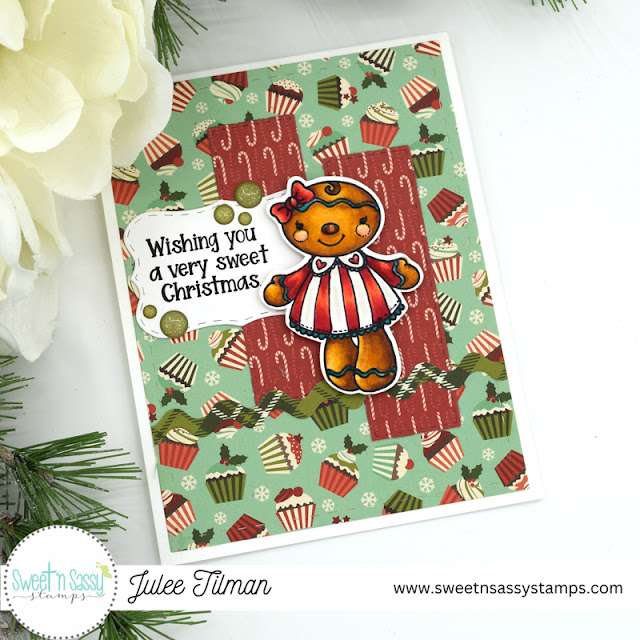
Hi friends! I'm back with another super sweet gingerbread card, this time featuring the girl gingerbread from the Sweet Holiday Wishes set.

These little cookies in the set are so fun to color.  I colored her up with Copic markers, giving her a little red and white striped dress with a bit of turquoise trim.  The sentiment from the set is stamped onto a die cut from the Bookmarks and More Dies


I used more of that same paper pack I used on my boy card earlier this week. Love it, and can't believe I hoarded it without using it for so long! I added a little ricrac with the same bookmark die set and coordinating papers, then finished off with a few sparkly enamel dots.

Thanks so much for stopping by today! I hope you have a fantastic start to your weekend.

***********
This post contains affiliate links to Sweet 'n Sassy Stamps. When you place an order after clicking one of these links, I may receive a small commission at no additional cost to you. Thanks so much for using my links and supporting this blog. 💙

Fun Fall Days


Hi friends! I'm back with a fun autumn card featuring the Fall Days stamp set from Not 2 Shabby's Fall Quarterly Release. I just adore the cute images in this set. How fun is that bunny on the pumpkin? 

I started off with the gorgeous leafy print from the Fall Love Paper Pad in mind, picking my Copic colores to match the color palette of the paper. Lots of Copic coloring on the sweet stamped images, then I cut with the coordinating Fall Days Shabby Snips dies.


Next I stamped the solo pumpkin from the set tone on tone onto a lost lagoon die cut circle.  I added a patterned paper circle behind it, then started layering my pieces, adding a bow to tie it all together. I finished off with a tag stamped with the title sentiment from the Fall Days set.

Thanks so much for stopping by today! I hope you have a super creative day.

***********
This post contains affiliate links to Not 2 Shabby Shop. When you place an order after clicking one of these links, I may receive a small commission at no additional cost to you. Thanks so much for using my links and supporting this blog. 💙

Gingerbread Holiday


Hi friends! I’m popping in today with a sweet Christmas card using the most adorable gingerbread set from Sweet’n Sassy Stamps.

I started by stamping the gingerbread boy from Sweet Holiday Wishes and then coloring with a mix of Copic and Olo markers. I recently got a set of 12 colors of Olos to try and I’m a little bit obsessed! Now if I could only curb my craft spending long enough to save up for the full set! First world problems, right? LOL. Anyhow, while I was coloring, I also colored the little holly banner. This set has coordinating dies, although I didn’t have them available when I was creating, so I used my Scan ‘n Cut.
 

Next I pulled out an old pack of paper from Moda Scraps. It’s a favorite of mine that I’ve been hoarding for years. I pulled the layout together with the patterned papers, then embossed a sentiment from my Holiday Cheer set onto the circle die cut. A few sparkly enamel dots finish off the card.

Thanks so much for stopping by today. I hope you have a fabulous day.

***********
This post contains affiliate links to Sweet 'n Sassy Stamps and Taylored Expressions. When you place an order after clicking one of these links, I may receive a small commission at no additional cost to you. Thanks so much for using my links and supporting this blog. 💙


Bearly Fall


Hi friends! Today I'm popping in with a sweet little fall scene card featuring goodies from the Not 2 Shabby Fall Quarterly release.  


The Fall Days set is so adorable, and I had so much fun coloring up the images to match the colors in the gorgeous Fall Love paper pad.  I kept the layout of the card pretty simple, so I could keep the focus on my stamped images. A little gold embossing and matting gives a bit of elegance, and I added some glossy accents to the dots on the patterned paper to capture that rainy day vibe. I finished with a few of the Fall is Coming Sparkle Enamel Dots for accent.

Thanks so much for stopping by today! I hope you have a wonderful start to your weekend.

Jaded Blossom September Release Blog Hop


Hey Everyone! Welcome to Jaded Blossom's September Stamp Release Blog Hop!
If you're here from Cindy's blog, you're in the right place, if you're just passing through start at the beginning because you don't want to miss a thing. You can find the complete line up at the bottom of this post.

Today I have to projects to share with you.  My first is a card using the NEW Gnome Dies: Graveyard Add Ons. I cut the gnome, coffin, spiderweb, and head stone pieces from white cardstock, then colored with alcohol markers. I coated the spiderweb with embossing ink and then embossed with a silver embossing powder.

Next I moved on to the background.  I just love the new Enchanted Night Sky Stencil that's the freebie for this release.  I decided to ink blend a night sky with chipped sapphire, blueprint sketch, salty ocean, and tumbled glass distress inks.  I splattered a bit of white bleed  proof ink on the top, then stenciled on the bats in black soot.


I added a couple of sentiments from the Candy Corn for Sale set to the coffin and headstone, embossed in sparkly black embossing powder. For the main sentiment, I pulled out the Spooky Season set and embossed trick or treat in white on black cardstock, then cut with the coordinating Outline Dies.


For my second project I created a fun little Octagon Treat Box with orange paper and some black and gray polka dot paper.  I assembled a fun little gnome pumpkin using the Gnome Dies: Spooky Add Ons. The boo glasses are cut from glitter paper and I used the toad's eye pieces to make some googly eyes for my gnomie. I tucked in a few Reese's pumpkins (yum), tied up in a bow, then finished off with a sentiment from the Spooky Season set. and a bat from the Halloween Border Dies.

Thanks so much for stopping by today! I hope you enjoy the hop. All the deals and hop details are below.

And of course we have to have a deal for you right?

Regular Price for the Release Package is $148.99

FREEBIE OFFER: Enchanted Night Sky Stencil
1) Free with orders $50 or more (before tax/shipping)
2) Order MUST contain at least 1 new release item
3) Freebie offer is Thursday and Friday Only, while supplies last


BLOG CANDY

1 Lucky Winner will get to pick a stamp set of their choice!
Just leave a comment on all the blogs along the hop!
The more blogs you comment on the more chances you have to win!

Now on to the HOP....

Just in case you get lost here is the Entire Line Up:

Jaded Blossom September Sneaks Day 3


Hi friends! It's the final day of sneak peeks before tomorrow's Jaded Blossom release! Today we're peeking our first makes with Corny Halloween with Outline Die and the Enchanted Night Sky Stencil Freebie. It's only available as a free gift with a $50 purchase that includes at least one new release item through Friday, while supplies last. The Gotta Have it Now Package is available now and release items will be available for purchase individually tomorrow.

How cute is this franken-candy from the Corny Halloween set? I just had to use him for today's card! I'm a big candy corn fan for decorating, although I don't really like to eat it. For this card, I colored up the franken-candy with alcohol markers, then cut with the outline die.


Next I pulled out the new Candy Corn Stencil and inked it up with brown, green, and white inks on lime cardstock.  I thought a shaker would be fun, so used the Stitched Circles and Scallop Circle Dies to create a circle window and frame.

Next I pulled out the spider from the Gnome Dies: Graveyard Add Ons and the candy corn dies from the Build a Booth: Halloween Add ons and colored them up with Copics to coordinate with the card colors.  I layered my images on top of the shaker, placing some Doodlebug Monster Madness paper behind the shaker and then using the same patterned paper for the sentiment.

Thanks so much for stopping by today! I'll be back tomorrow with our new release blog hop!


  We have our Gotta Have it Now Package for $135.99

September 2023 Release will include:

2 - 4 x 6 Stamp Sets
3 - New Dies
1 - New Outline Dies
1 - Stamp/Die Combo
1 - New 3 Piece Stencil
1 - Freebie Stencil

Ala Carte Items available on Thursday 12 am PST 

This Package is only available while supplies last!
*Freebie Stencil - Only Free Thursday and Friday with a $50+ purchase or While Supplies Last. Must also purchase at least one item from the new release*

Regular price for the release package is $148.99

Jaded Blossom September Sneak Peeks Day 2


Hi friends! I'm back today with another fun sneaky peek at the September release from Jaded Blossom.  Today we're shining our little spotlights on the new Gnome Dies: Graveyard Add Ons, Build a Booth: Halloween Add Ons, and Candy Corn for Sale.

I'm kind of loving pink and orange together for Halloween right now, so I decided to make a fun little pumpkin patch booth for today's card.  I started with the Build a Booth Dies, cutting the base, boards, and sign from Cute & Pink Not 2 Shabby paper. I then went to work cutting and assembling tons of pumpkins from the Build a Booth: Halloween Add Ons. The base banner is cut from olive cardstock, then I layered up the pumpkins onto the banner and piled some up on the booth.  The booth sign uses a sentiment from the new Candy Corn for Sale set.  


Next I pulled out the Gnome Dies: Sign Add Ons to create a little chalkboard sign using a different sentiment from Candy Corn for Sale. For the background I wanted to keep it simple and fun, so decided on a favorite stenciling technique.  I first blended tiki torch and it's a girl Catherine Pooler inks lightly onto white cardstock. Next I pulled out the previously released Pumpkin Stencil and stenciled over the blended background in the same colors with a heavier touch. Quite easy, but such a cool effect.

Thanks so much for stopping by today. Gotta Have it Now Packages are shipping now if you can't wait until release day!

  We have our Gotta Have it Now Package for $135.99

September 2023 Release will include:

2 - 4 x 6 Stamp Sets
3 - New Dies
1 - New Outline Dies
1 - Stamp/Die Combo
1 - New 3 Piece Stencil
1 - Freebie Stencil

Ala Carte Items available on Thursday 12 am PST 

This Package is only available while supplies last!
*Freebie Stencil - Only Free Thursday and Friday with a $50+ purchase or While Supplies Last. Must also purchase at least one item from the new release*

Regular price for the release package is $148.99

Jaded Blossom September Sneaks Day 1


Hi friends! September at Jaded Blossom always brings Halloween fun! We'll be sneaking peeks at all sorts of spooky cute new goodies each day through release this Thursday, September 7. Today the team is sharing their first looks at the Gnome Dies: Spooky Add Ons, Spooky Season, Spooky Season Outline Dies, and the Candy Corn Layering Stencil.

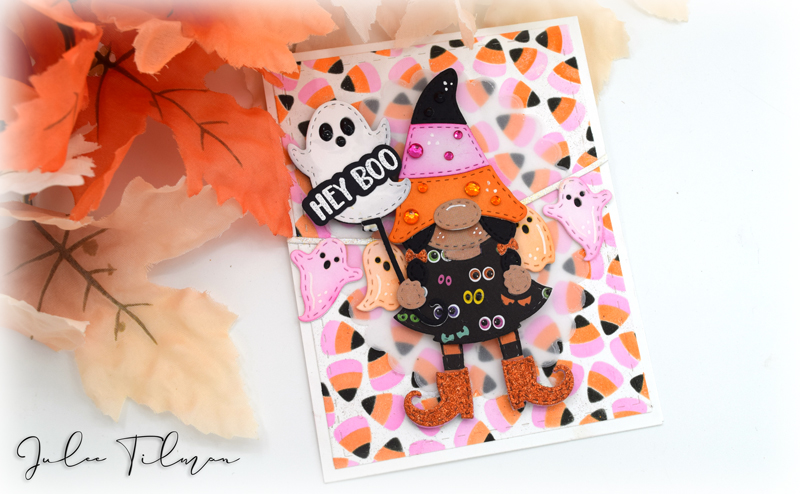
I am definitely crushing on the new Candy Corn Layering Stencil. I don't enjoy eating this candy, but it's a favorite of mine for decorating. And now for making backgrounds! I've tried all sorts of fun color combos, and they all look fabulous.  For today's card I used It's a Girl and Tiki Torch Catherine Pooler Inks, and Black Soot Distress Oxide. The panel is cut with my old standby, the Card Mat Die.


Next I moved on to our party loving gnome girl. I just had to dress her up in the candy corn hat from the Gnome Dies: Spooky Add Ons, adding some bling because a girl needs to sparkle!  Her dress is cut from some googly eye paper, which I accented with glossy accents to make them stand out. For her legs, I pulled out last year's Gnome Dies: Costume Add Ons 2 set for her legs and sparkly witches boots.

I love the new little ghosty balloon and dressed it up with a sentiment from Spooky Season embossed in white on black card stock and then cut with the coordinating Spooky Season Outline Dies. Once I assembled all the pieces and set it on the background there was a lot going on. I decided to soften the look with a vellum Scallop Oval die cut behind. Then I divided the background with the ghost banner from the previously released Halloween Banner Dies, colored in coordinating colors.

Thanks so much for stopping by today! I hope you found a little inspiration here. Individual products aren't available for purchase until release day, but you can order the entire release now at a discount.

  We have our Gotta Have it Now Package for $135.99

September 2023 Release will include:

2 - 4 x 6 Stamp Sets
3 - New Dies
1 - New Outline Dies
1 - Stamp/Die Combo
1 - New 3 Piece Stencil
1 - Freebie Stencil

Ala Carte Items available on Thursday 12 am PST 

This Package is only available while supplies last!
*Freebie Stencil - Only Free Thursday and Friday with a $50+ purchase or While Supplies Last. Must also purchase at least one item from the new release*

Regular price for the release package is $148.99

Stocking Up


Hi friends! It's the first Sunday in September and that means it's time for a brand new challenge at Jaded Blossom. This month's challenge is anything goes. I hope you'll give it a go and can't wait to see you in the link up over on the Jaded Blossom blog.

August Challenge:
ANYTHING GOES
(must use at least one Jaded Blossom Product)


My project today is a little stocking gift card holder.  I love shabby chic Christmas decor, so I pulled out some Prima papers from my stash to create this little stocking using the Stocking Gift Card Die.

To accent the stocking, I created a fun flower using the Small Poinsettia Die.  I curled the papers a bit with a stylus, then shaded around the edges with victorian velvet ink and layered together. The loop and bells for the stocking are cut from rose gold cardstock. Typically I would tuck a gift card in the pocket behind the stocking, but this was for a crafty Christmas swap, so I filled a little clear bag with some coordinating ephemera and stickers.


I finished off with a sentiment from the Christmas Blessings stamp set embossed in rose gold onto a vellum tag from the Mini Tag Dies 3 set. I love making these stockings. The dies make it so easy, but the finished product makes a great impression. I gave some similar stockings lto my family last Christmas and they were a huge hit.

Thanks so much for stopping by today! I hope you have a fabulous week.


New Holiday Cheer


Hi friends! It's a brand new month, and this month I have a stamp set releasing from Sweet & Sassy Stamps called Holiday Cheer. It includes a couple of sentiments from a digi I released a few years back, as well as some new sentiments in the same fonts and a couple new images. I actually created this set last year, but it didn't make it in time for the holiday release. So I'm happy it's here now!


One of my favorite candies is peppermint, so candy cane season makes me happy. My favorite thing in the holiday season is vanilla ice cream with crushed candy cane pieces. So I had to start off with the candy cane image, coloring with Copics and accenting with a white gel pen.  There are also coordinating dies available for the coffee cup and candy cane images in the set. I also colored two coffee cups to add to my scene.


I pulled out the new Holly Layering Stencil and stenciled it onto a white rectangle in pink and green ink.  I then partially stamped the Script Background over it in the same colors of ink for a fun background.  I used the same technique for the sentiment from the Holiday Cheer set, cutting out with Circle Dies and then adding a stenciled holly sprig that I fussy cut.

Thanks so much for stopping by today! There are a bunch of new products in the Sweet & Sassy Stamps shop, so if you're curious, hop on over. All new releases are 10% off through September 9.