Powered by Blogger.

Look Mom, No Stamps

Seriously... how is it already the last day of October? Time just keeps on speeding by! Today I'm sharing a couple of cards I created earlier this month for the Crafter's Companion Gemini FoilPress Product Focus. I didn't use any stamps on either of them, which is unusual for me, but I love the way they turned out.


First up is a shabby chic card.  I foiled the Happy birthday and small butterfly dies that come with the FoilPress onto designer paper in gold, then cut one butterfly from cardstock and then foiled over it so I could pop it up.  The 3d embossing folder came with the Gemini Jr. and is so lovely! It embossed both a swirl and a linen texture that's just gorgeous. I debossed it by coating one side of the folder with brown ink and then running through my die cut machine.  I finished off with some paper flowers, lace trim, and gold beading.


My second card for today was actually one of my mistakes at learning to foil, but I was able to salvage it and really like the finished card!


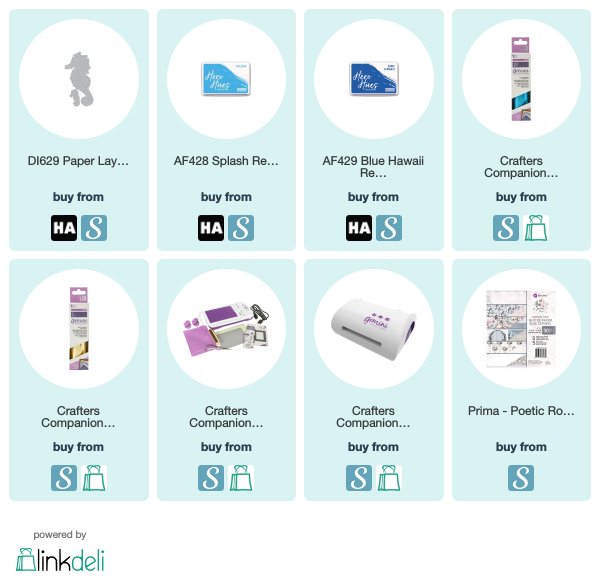
 I started by smooshing some blue hawaii and splash reactive inks onto water color paper.  Next I foiled the paper layering seahorse die in turquoise.  This is a very detailed die and it foiled, but the lines were so faith they were so hard to see on the background.  So I then decided to just cut the seahorse out, but I failed to tape it down and it slid just a bit.  I decided that was okay, though, so I  backed the negative of the die cut with the turquoise file, then popped up the seahorse for a little dimension.  I finished off with a sweet little Hello die included with the Gemini Jr.


Thanks so much for stopping by today! I hope you have a fabulous last day of the month!

Compensated affiliate links are used where possible. When you place an order after clicking one of my links, I receive a small commission at no additional cost to you. Thanks so much for using my links and supporting this blog. 💙

It is Well

Hi friends! Today I'm sharing a fun little card for Shimmerz. I was inspired by one of the Dotz in the Sweet Girl collection. I loved the blue and pink flowers, so decided to build my card around that.


I started by masking off a rectangle of watercolor paper, then stenciling a modern stencil with Moulin Rouge Shimmerz. I let that dry, then put down a ledger stencil and used Pip Pip Cherry-O Shimmerz  with that.  I then added some splatters with Blue My Mind Inklingz and Pip Pip Cherry-O and set the panel aside to dry.


Next I embossed the outline flower from the Fresh Start Stampz set in black a few times, then watercolored with the above colors.  I also stamped a couple of the leaves from the set and colored with Green Olive.  I just love that shimmer!


To finish the card, I stamped a sentiment from an old Verve set, Surely Goodness. It's one of my favorites and I embossed it in black, and then added the Dotz that inspired the card, as well as a sprinkling of sequins and enamel dots.

Thanks so much for stopping by today! If you're inspired to shop the Shimmerz store, mention my name in the order comments when  you check out for a free paint!


Compensated affiliate links are used where possible. When you place an order after clicking one of my links, I receive a small commission at no additional cost to you. Thanks so much for using my links and supporting this blog. 💙

Thanks Unto the Lord

October is my favorite month of the year. I love the falling leaves and how the world just lights up outside. The golden leaves all around time sometimes take my breath away as I'm driving. A last little hurrah before the bleakness of winter sets in.


So I'm squeezing in all the autumn goodness I can! For this card I chose the Leaf Silhouettes set by Sweet 'n Sassy Stamps. I love these bold leaves, and created a fun background with them stamping in distress oxides  on cardstock and then sponging withe some of the same inks and adding little patches of stamping with the Typewriter Text Background.


Next I stamped the Give thanks to the Lord sentiment from the set on a circle die, added a bit more of that text background and then matted with early espresso cardstock.  I added a little beaded stick pin and some seam binding for accent, then stamped a few more leaves and cut out to layer behind the sentiment.  A piece of lace trim is wrapped around the panel and then I added it to a card base that I embossed with a leaf folder and then rubbed lightly with an ink pad.


Thanks so much for stopping by today! I hope you have a marvelous day!  If you haven't had a chance yet, be sure to check out the Autumn Sale at Sweet 'n Sassy Stamps.


Compensated affiliate links are used where possible. When you place an order after clicking one of my links, I receive a small commission at no additional cost to you. Thanks so much for using my links and supporting this blog. 💙

Mojo Monday 526

Hi everyone! it's time for a new Mojo Monday sketch! Are you ready to play? I so appreciate everyone who plays along. It's always fun peeking in on your creations!


As always, you're free to play along with any papercrafting products your heart desires and enter as many creations as you like. Use the sketch as inspiration for your creation, then come link it up below so I can come take a look! The linky for this challenge will close on November 10, 2019. I have included dimensions on the graphic later in this post, but feel free to change them up to suit your needs.


This Mojo go round I've got a fun little sketch that's perfect for using up some of your scraps. I have no shortage of scraps to choose from, so had fun putting this layout together.


This sweet little scarecrow bear is from the adorable new Rhubarb's Harvest set. I colored him up with Kuretake Clean Color real brush markers and a waterbrush. So cute! I matted the circle cut out with a designer paper circle and embossed the happy harvest sentiment in gold in the bottom corner.


Alrighty, now it's your turn! I hope you enjoy creating with this sketch! Can't wait to see what you create!


Join me for Mojo Monday!
Click here to enter

Thanks for stopping much for by! I hope you have a super creative start to your week!

I so appreciate when you click on my compensated affiliate links to shop. I get a very small percentage, but it's enough to cover the monthly fees for the linkup widget for Mojo Monday and the email subscriber service for my blog, which makes me (and hubby) happy! 💙

October Keeping Christmas Blog Hop


Hi friends! It's the 25th of the month and that means it's time to join my crafty friends once again as we share Christmas inspirations along our monthly Keeping Christmas Blog Hop.


If you're just popping in, the hop starts over at Kelly's blog. If you came from Claire Broadwater's blog, then you're right on track! 😊


Today's card is one of those that puts the true meaning of Christmas front and center. I love this sweet little baby Jesus image from the Adore Him set. I colored it up with Chameleon Fineliners and then added the alleluia stamp above it and cut in an oval shape.


The sentiment is stamped onto a strip of white cardstock and then I bordered it with some fun snowflake ribbon from my stash.  I gave the top border a string of gold beads, then layered this onto some pretty designer paper and put it all together. Simple and quick, my favorite for Christmas!


Hope this fun little card has inspired you to get going on your Christmas projects! It's only 2 months away! For more eye candy and inspiration, head on over to the next stop on the hop... Kim Heggins!

Here's the full hop list:
Julee Tilman ✋You are here


Compensated affiliate links are used where possible. When you place an order after clicking one of my links, I receive a small commission at no additional cost to you. Thanks so much for using my links and supporting this blog. 💙

Shimmery Spirits

Hi friends! I'm popping in today to share my October color challenge creation for Shimmerz Paints.  This month our entire team is trying one color that we normally wouldn’t chose. Something that helps us branch out and grow as designers. Come join us! Use the hashtag #shimmerzcolorchallenge to share your projects and how they inspired you to try something new. We can’t wait to see what you create!


I selected Mango Tango Vibez for the challenge. This is one of those misunderstood colors I think. I've actually put it in my cart at least 7 times, then realized I already owned it, but hadn't used it. As I started playing around with it for the challenge, I realized where the disconnect was happening. I kept thinking it was a rusty orange (the old website swatch was more orange in color, and mangos are kind of orange-ish right?). But Mango Tango is actually this gorgeous light red/coral color. Add in the shimmer of Vibez and this is one BEAUTIFUL color!


I started with the idea of using the Twist stencil from The Cat's Pajamas with the spray and some texture paste, but changed gears after a very messy first attempt.  I set my stencil down on a page to clean it and fell in love with the resulting ghost print. I jut had to use it, so cut it down to card size and then pounced some Angel Wings Shimmerz randomly around the panel with a stencil brush to create a snowy feel.


I then pulled out the Filled to the Brim stamp set I illustrated (psst... it's on a great sale!) and stamped the coffee cup, then watercolored with Mango Tango Vibez and fussy cut.  The sentiment is stamped on a circle die cut, then I layered them together adding in some mini holiday greenery die cuts from pine cardstock. I pounced on these with more Angel Wings and also flicked some Snow Storm Vibez for a little more texture and depth.


Next I took a newsprint tag from my stash and spritzed with Mango Tango, covered the bottom with a bit of washi tape and then accented with a seam binding bow and a couple jingle bells.

Thanks so much for stopping by today! As always, if you feel inspired to do a little shopping in the Shimmerz Shop, leave my name in the comment section of your order for a free surprise.


Compensated affiliate links are used where possible. When you place an order after clicking one of my links, I receive a small commission at no additional cost to you. Thanks so much for using my links and supporting this blog. 💙

Leafy Thanks

Hi friends! Happy Monday! I'm popping in today with another fun card I made for the Splitcoaststampers Product Focus on the Gemini FoilPress.


I started with the Typewriter Text Background from Sweet 'n Sassy Stamps. I love this stamp so much. I stamped it a couple times to cover the whole watercolor panel, then I embossed the leaves from Autumn Splendor in gold over the top of it. I used rusty hing distress oxide and a blender pen to color it in. Love this technique so much!


Next I moved on to the foiling portion of the card. I foiled the thank you die in gold by heating it on the Gemini FoilPress and then running it through the Gemini Jr. I cut this out with a Tags & Frames Infinity die, then cut a larger die and foiled the entire die cut and then swiped with the distress oxide to fill in any of the distressed parts.  A few shabby edges and I was finished.


Thanks so much for stopping by today! I hope you have a fabulous start to your week!


Compensated affiliate links are used where possible. When you place an order after clicking one of my links, I receive a small commission at no additional cost to you. Thanks so much for using my links and supporting this blog. 💙

Gel Print Hello

Hi friends! Today I've got a fun card to share that I made for last week's Mix-ability challenge over on Splitcoaststampers. The challenge was to make a mixed media card, confining your artwork to a 3 x 3" square.


To start I pulled out my gel plate, a brayer, and some acrylic paints. I chose some deep fall colors, creating several layers until I was happy with the overall look of my piece. I then cut it down to a 3 inch square and mounted on a foam sheet.


Next, I grabbed the beautiful Tall Blooms stamp set from Reverse Confetti and embossed it in gold on vellum. I then mixed up a little Mango Tango spray with some crystal clear lacquer and painted the leaves.  I hand trimmed the two sprigs, then layered together and accented with a bit of gold thread and a rhinestone.  I finished with a white card base and the a happy hello sentiment embossed in gold. Clean and striking. One of my favorite cards in a while!


Thanks so much for stopping by today! I hope you have a super awesome start to your week!

Compensated affiliate links are used where possible. When you place an order after clicking one of my links, I receive a small commission at no additional cost to you. Thanks so much for using my links and supporting this blog. 💙

Eat More Hole Foods


Hi friends! Happy Friday! Today I have a fun calorie free treat for you! I just love the fun Donut Worry set from Sweet 'n Sassy Stamps and couldn't wait to color it up. The boys are out of school today, so maybe I'll take them on a special donut day excursion!


I stamped the donuts a few times in chocolate truffle amalgam ink, then added the icing stamps. I colored with Kuretake clean color real brush markers and a wink of stella clear glitter brush pen, then fussy cut, using a circle die for the center portion. I luckily was able to find a pad of paper that quasi-matched the colors I had used and i thought the polka dot look was super fun with the pastel donuts.  I added white mats, with a border die, then glued everything together and added the sentiment.


Thanks so much for stopping by today! I hope you have a fabulous weekend!

Compensated affiliate links are used where possible. When you place an order after clicking one of my links, I receive a small commission at no additional cost to you. Thanks so much for using my links and supporting this blog. 💙