Powered by Blogger.
Showing posts with label Card Sets. Show all posts

March Not 2 Shabby Inspiration Hop Gift Card Set


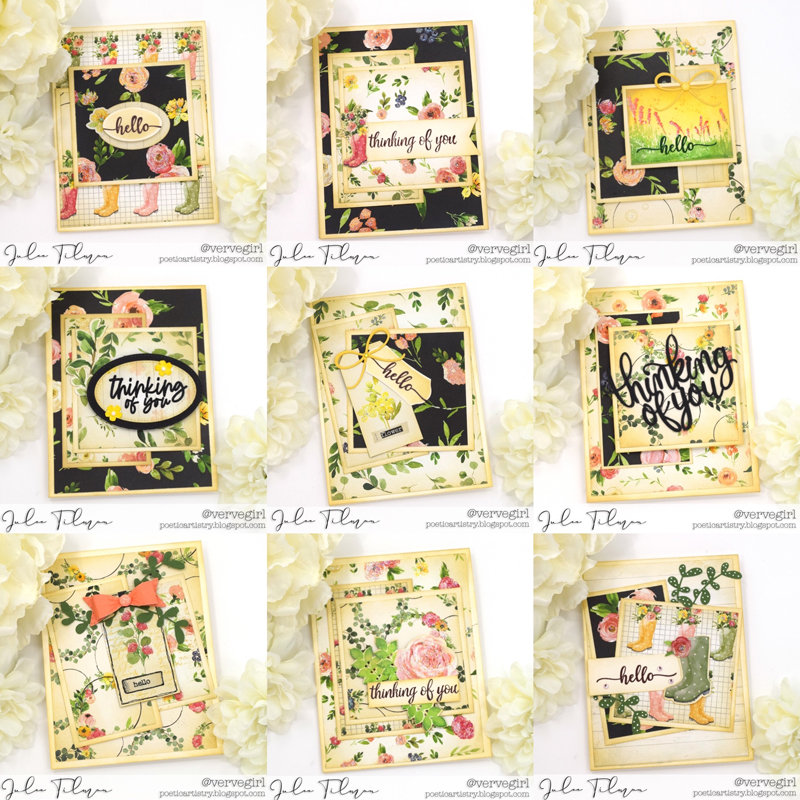
 Hi friends! It's time for the March Not 2 Shabby Inspiration Hop over on YouTube. You'll find tons of inspiration with the March products as well as a chance to win a gift certificate to the Not 2 Shabby Shop. For the hop, I'm sharing a video on making this pretty little card set with products from the March "Full Bloom" Box of the Month.


You can watch the video here, or on my YouTube channel, then follow the instructions to hop along and don't forget to click the link in the description box of my video to enter the giveaway.


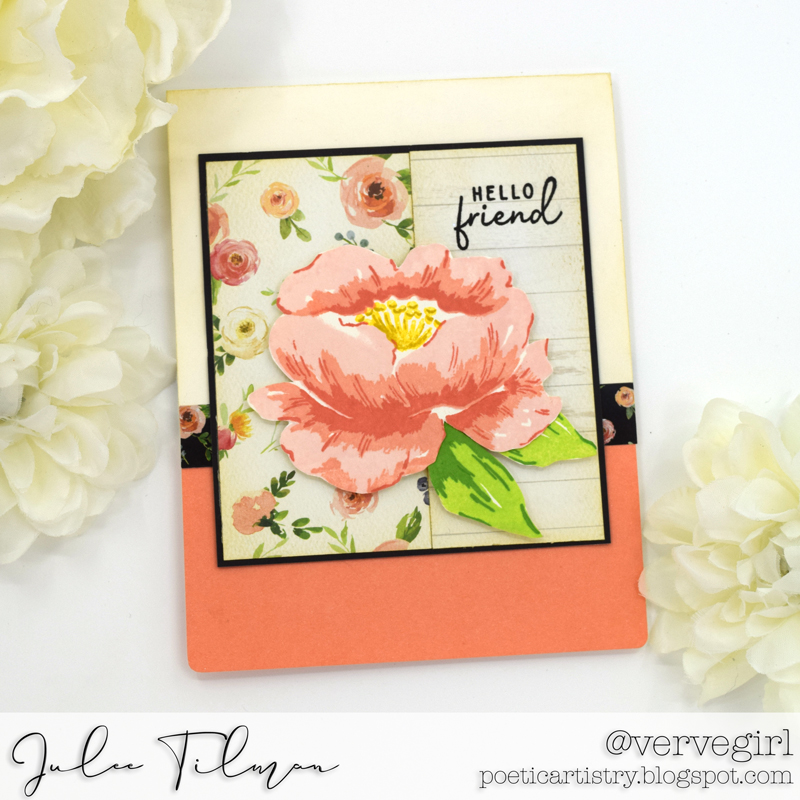
Although I'm not much of a fan of making multiple cards of the same design, I do enjoy giving card sets for special occasions. It's a great way to give a meaningful handmade item to someone you love. The new Just Because stamp set in the March Box of the Month is absolutely beautiful, and with several all occasion sentiments, it's perfect to use to create a set of cards for gifting.


I started by coloring the tulips with a mixture of Ohuhu and Copic markers.  I cut the flowers out with my Brother Scan 'n Cut, doing a teeny bit of fussy cutting for the parts in between the leaves and stems.
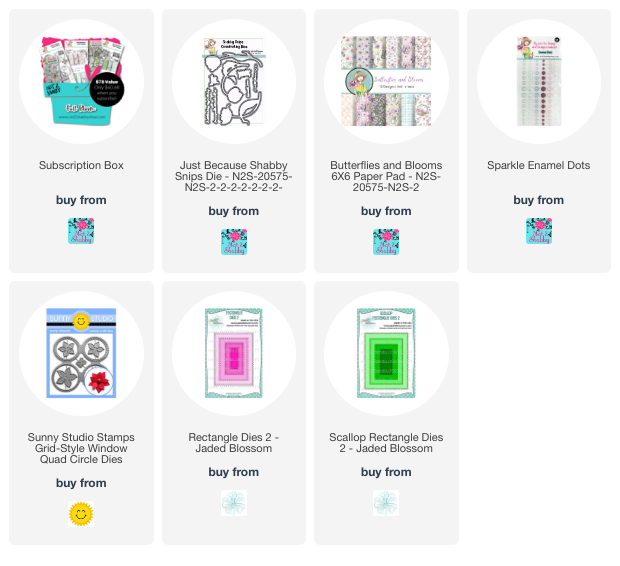
(My dies hadn't arrived when I created these cards, but there are coordinating Just Because Dies available for purchase separately.)


I cut a stitched rectangle from white cardstock, then used the Window Quad Circle Dies from Sunny Studio Stamps on the rectangle die cut to make the window panel. The circle cut outs are about 1.5", so I cut some squares that were about 1.675" to glue behind the circle windows.  These patterns are from the gorgeous Butterflies & Blooms paper. 


I chose a scalloped rectangle of patterned paper to mat the panel, cutting a stitched rectangle out of the center, so as not to waste any of that pretty paper!  The flowers for most of the cards were tucked into one of the bottom circles, then adhered at the top with some dimensional foam tape for a bit of dimension.


I used sentiments from the Just Because set to finish off the cards, then accented with some Cherry Blossom Spring Cottage Sparkling Enamel Dots.

Thanks so much for stopping by today! I hope you have a fantastic day!

Hello and Thinking of You

Hi friends! Today I'm popping in with a bunch of cards made with the Call Me Crafty Al December 2021 Sheetload of Cards sketch and cutting guides. This was my first time doing one and I had a lot of fun. This one made 9 cards with three sheets of 12 x 12 paper, plus cardstock for layering, images, and card bases.


I have lots of pretty 12 x 12 paper that needs a little love, so pulled out a favorite collection from Carta Bella. I'm not one to mass produce since I get bored with the same design. So I didn't stick to the sketch for all of my cards, instead moving the cut pieces around as I wanted.  I also went with a portrait layout instead of landscape because I prefer creating in that direction.

I'm getting ready to send off a box of cards to the Scrapbook.com Card Drive and right now they're looking for thinking of you and hello cards, so that's what I focused on for this set, mainly using the Script Sentiments (now back in stock!) set from Sweet 'n Sassy Stamps.


In addition I used the Nature Silhouettes set for the top right card and the bottom center card.  The thinking of you cards in the center row use sets from Hero Arts.


When I was done I had some leftovers, so decided to make a tenth card featuring a new to me clearance find, Painted Peonies set from Concord and 9th. Isn't that flower gorgeous?  I used C9 inks for stamping the layering stamps, then fussy cut the image to pop up as my focal point.

If you're interested in playing along, the January Sheetload of Cards is inspired by a Mojo Monday sketch of mine. 

Thanks so much for stopping by! I hope you have an incredible start to you week!

-Julee

June Sweet 'n Sassy and Shimmerz Releases

Hi friends! It's the first day of a brand new month and that means it's time for fresh new products from some of my favorite companies. I used to think that creating for my one company's releases was a lot of work, but now that I design cards for several companies, I have a much greater understanding and respect for what it takes to be a designer on multiple teams! Juggling all the deadlines can definitely get tricky, but the product is all so stinking awesome I just can't ever say no! Ever have that problem? 😆


So today is officially release day for Sweet 'n Sassy Stamps and for the June Shimmerz Paints Color Kitz. Both releases are awesome, with so many must haves! Seriously.. the colors.... the stamps! I combined them both for today's project, a duo of cards.


It's probably not much of a surprise that I reached for the blues in the June Missy Whidden Color Kit first. This Hint of Mint spritz is fabulous and a new color that's exclusive to this month's kit. I spritzed the Hint of Mint and the Chance of Rain over a stencil to get the background, using a separate color on each diagonal and letting them mingle together in the middle. By the way, these two colors make THE most gorgeous water scenes, you'll see some of that later in the month! The sentiment is from the gorgeous new Hymn Word Art set. I love the classic hymns and the lettering style on this set of stamps is just fabulous. I stamped it with distress oxide ink and embossed in clear on a panel I had lightly washed with the Hint of Mint Spray.


I did the same technique for the background and sentiment on the pink card with the Pink Caviar Shimmerz and Dear John Letter Inklingz. The flowers on both cards are from the ADORABLE new Mer-Mazing set. I am so in love with this new set by a new illustrator for SNSS. To change things up I chose a different orientation for the two cards, adding some lace trims and colored cardstock to finish things off.


So what's in the June Missy Whidden color kit?


  • Exclusive color - Hint of Mint Spritz
  • Pink Caviar Shimmerz
  • Dear John Letter Inklingz
  • A Chance of Rain Spritz
  • One Exclusive Paige Evans cut file
  • One exclusive package of Simple Sayingz Dotz
It's a super versatile kit and only available while supplies last, so grab yours while you can!

As always, if you place an order in the Shimmerz shop, put my name in the order comments so they know who sent ya! While you're there be sure to check out the other June Color Kit that released today!


The new release from Sweet 'n Sassy Stamps is fabulous and if you love it all, you can purchase the early bird bundle at a discount. Then by just adding $5 more to your order, you'll get you FREE US Shipping, and the gorgeous June Stamp of the Month, Happy Irises!


I'll link up both releases below in case you're feeling in the mood to shop!

I so appreciate when you click on my compensated affiliate links to shop. I get a very small percentage, but it's enough to cover the monthly fees for the linkup widget for Mojo Monday and the email subscriber service for my blog, which makes me (and hubby) happy! 💙


Today's Supply List


Sweet 'n Sassy Stamps June Release


Shimmerz Paints June Color Kitz (and individual colors)

Scripture Card Set

Hi friends!  I'm back with another card set using the Viva la Verve December One Sheet Wonder template.  This card set was a gift for my mom's birthday earlier this year and is the set that inspired the challenge.  I'm loving seeing every one's take on the challenge and have posted my weekly picks for the Viva la Viewfinder over on the VLV Sketches blog today.


For the card set, I went a little shabby chic, using verses from the Scripture Medley 2 set, some gorgeous My Mind's Eye papers, a bit of lace trim, and some butterflies made with the  Flutterby Die and some chocolate pearls.


The base panel is cream cardstock that was embossed with an embossing folder, then I distressed the edges with ink and a paper distresser. For the Joy card, I used the banner piece as a sash, but didn't really like the way it kind of looked a bit like I was slashing out joy, so changed up the template when I made the challenge to move the banner above.


The butterfly embellishments are made by die cutting two of the  Flutterby Die from so saffron cardstock that had been embossed with the same embossing folder as the main panel.  I inked up the edges and then layered them together, adhering only in the center, then folding the wings on the top butterfly up and embellishing with some dark chocolate pearls.


On this final card, I loved the whimsical look to slightly skewing the verse.  I also turned the square as well to balance things out, Then finished off with a flower from my stash.


Well, that's all from me.  I hope you have a fabulous weekend!  We've got extended family gatherings Saturday and Sunday, as well as our 17th wedding anniversary tomorrow!


Enabler's List
Stamps:  Scripture Medley 2 (Verve Stamps)
Paper: My Mind's Eye, so saffron (SU!) cream (Neenah)
Ink: Early Espresso (SU!), vintage photo (Ranger Distress)
Accessories:  Flutterby Die (A Cut Above by VERVE), Flowers & Flourish embossing folder 2 pk. (Sizzix), paper flower, dark chocolate pearls (Pizzazz Aplenty)

Holiday Coffee Lovers Blog Hop


Hi friends!  I'm taking part in the Holiday Coffee Lovers Blog Hop today.  You never need to ask me twice to make a coffee themed project!  {grin}  The hop link up list is over on Amy Tsuruta's blog, so head on over there for all the hop details, awesome sponsor list of prizes and to see everyone's coffee-lovin' projects. Many of the participants (including myself) are offering blog candy for commenters, plus there are some Super Sponsor prizes (including a Verve GC) up for grabs for participants who link up their cards to the link list.  So why not make a little coffee (or your favorite hot beverage) inspired creation and link it up?


The Viva la Verve challenge this month is a One Sheet Wonder template that I designed for making card sets.  I love to have a few coffee gift cards on hand to give to friends and neighbors we happen to see during the holidays, so I made this little card set to go along with the gift cards.


My card set uses one sheet of 6 x 6" paper from the Season's Greetings pad by Echo Park and some neutral cardstock.  Red and aqua are a favorite holiday color combo for me.  This paper has a nostalgic flair that reminds me of Christmas Eve's past spent with my grandparents and their 1950's style decorations. Fond memories, indeed.


For this set of cards, I used the Holiday Treats stamp set and coordinating Cup of Cheer Die Set from Verve.  Each circle is stamped in soft sky ink with the three sizes of snowflakes in the set, then I added the sentiments in early espresso or cherry cobbler ink.  The mugs and java cups are stamped in cherry cobbler and one in old olive and die cut.  Each background panel was embossed with a Darice snowflakes embossing folder and I sponged all of my paper layers with some vintage photo ink for an aged look.


My embellishments include my all-time favorite Christmas embellishment... jingle bells!  Gold cord, linen thread and seam binding make for the perfect way to tie these on, then I added some little wooden hearts and stickles to finish things off.


That's all about the cards, but there's blog candy for a lucky commenter as well!

Comment for a chance to win:
Just leave me a comment and you'll be in the prize drawing to with the following treats:  Verve Stamps Holiday Treats stamp set, Cup of Cheer and Coffee Word dies, Pink Paislee Snow Village 6 x 6 paper pad, aqua, red, cream and gold spools of ribbon, and  a bag full of jingle bells!

Thanks so much for stopping by!  Don't forget to head on over to Amy's blog for all the fun deets!

Enabler's List
Stamps: Holiday Treats (Verve Stamps)
Paper: Season's Greetings (Echo Park), cream (Neenah)
Ink; early espresso, soft sky, old olive, cherry cobbler (SU!), vintage photo distress (Ranger)
Accessories: Cup of Cheer Die Set (A Cut Above by VERVE), snowflakes embossing folder (Darice), Classic Cricles Nestabilities (Spellbinders), jingle bells, thread, cord, seam binding, wooden hearts, Frosted Lace Stickles (Ranger)

O Christmas Tree Blog Hop

Hi friends!  It's the 5th of the month and that means it's time for another Diva Inspirations Blog Hop and Challenge!  I'm the start of the hop and as usual, there's a comment prize, so be sure to leave a little shout out in the comments as you hop about for a chance to win some new Verve! Link list is at the bottom of this {very} long post.


It's also the first Friday of a new month, so I'm hostessing Viva la Verve as well.  Since December is a super busy month, I did a special 6 x 6 One Sheet Wonder (OSW) layout with 4 sketches that will be our challenge for the whole month.  I think these are perfect for making card sets for gift giving and also for knocking out holiday cards, so I hope you enjoy them.  I've made three card sets already with the OSW template, so you'll be seeing some more inspiration with the sketches as the month progresses.


The inspiration challenge this month is O Christmas Tree, so I combined Viva la Verve with the inspiration, adding stars and snowflakes to my cards, which are some of my favorite things to trim the tree with.


My cards use one double-sided 6 x 6 sheet of patterned paper, four circles, card fronts and card bases in crumb cake.  I used the Holiday Greetings set for stamping on the circles, then embellished with some stars, snowflakes and rhinestones.  I hand cut the banner ends on a few of the pieces as well. All in all a super quick card set, though!

Here's the link to the full printable PDF of the template. 


This month's challenge is entitled O Christmas Tree:


Ribbons and sparkle and merry galore! Create a card inspired by the decorations of the season!

Need a little inspiration? Check out the blogs linked below to see what the other Divas did with the challenge! It's sure to be a treat, and speaking of treats, we've got a prize for one lucky commenter along the hop! Check out the Verve Blog today for all the prize info and deadlines!

Next up on the hop is Amy.
1. Julee6. Karen
2. Amy7. Sankari
3. Anya8. Sarah
4. Betty9. Sony
5. Jen10. Susan

Enabler's List
Stamps: Holiday Greetings (Verve Stamps)
Paper: Christmas Basics (DCWV), crumb cake (SU!)
Ink: Mossy Meadow, Crumb Cake (SU!), Vintage Photo Distress (Ranger)
Accessories: glitter stars (Frost it Pink), snowflake charms, rhinestones, paper crimper, snowflakes Texture Fades (Tim Holtz Alterations), Classic Circles Nestabilites (Spellbinders)


A Simple Hello and Complete Set

Happy Thursday, friends!  I'm popping in with another card using this week's Viva la Verve! sketch.  It's actually one I made for the latest Verve release and the card that inspired the sketch, but I never posted it, so today's the day!  {grin}


It's a super simple card, just a white square stamped with the Hello Friend plain jane and the two polka dot butterflies from Petals & Wings.  I colored the butterflies with copic markers, then added some black rhinestones for the butterfly bodies.  The square is attached to a black cardstock panel with washi tape and then mounted on a white card base.

And, there was one more card in that card set I made for the release, so I might as well show it now.


Here, I've stamped the flowers and stems from Petals & Wings on a white rectangle and added just a portion of one of the borders from the Scalloped Trim Trio Die Set in pistachio pudding.  The sentiment is the new Being Awesome plain jane and it's stamped in the vintage oval frame from  Die Sidekicks and cut with the coordinating Vintage Oval Die.  I added some faux enamel dots to the centers of the flower by taking some small circle punches, stamping with the polka dot flower center stamp in the coordinating ink and then covering with a thick layer of glossy glaze.  It's hard to see, but the card base is a pretty embossed polka dot background.

Here's the whole set of cards from the release in one (not so great) photo...


Thanks so much for stopping by today!  Have a wonderful day!

Enabler's List
1st card
Stamps: Hello FriendPetals & Wings (Verve Stamps)
Paper: black, white
Ink: black (TCP Studios)
Accessories: washi tape, bling

2nd card
Stamps: Being Awesome, Die SidekicksPetals & Wings (Verve Stamps)
Paper: Black, white
Ink: blushing bride, soft sky, pistachio pudding (SU!), black
Accessories: Vintage Oval Die, Scalloped Trim Trio Die Set (A Cut Above by VERVE), polka dot embossing folder, ribbon, glossy glaze

WCMD Diva Inspirations Hop Card Set

Hi friends!  Happy World Card Making Day!  It's the official start to the holiday card making season and it's also the 5th of the month, so that means the Divas are hopping with their monthly Diva Inspirations Hop!  There's a great BIG PRIZE up for grabs, so be sure to read on for all the details on how to win some shiny new Verve!  I'm the start of today's hop, so grab a treat and let's get started!


Want to win Verve's ENTIRE September Release? One lucky commenter along the hop will win our entire September rleease, so be sure to leave some comment love on all the blogs linked below to be entered in the drawing!  Comment deadline for the prize drawing is 5pm Mountain on Thursday, October 10.

For my project, I decided to pair an old favorite, Joyful Blooms, with the newly released Poppy Birthday for a fun little card set.  I usually give at least a couple card sets away as Christmas gifts each year, so I thought I'd get a jump on one of them.


I drew up a simple little sketch and cut all my pieces before I started. I've attached the sketch  if you want to use it, plus listed my measurements:
(4) 2.25" x 3" pieces and (4) 4.25" x 4.25" card bases from white cardstock
(4) 4.125" x 4.125" mats and (4) scallop rectangle nestabilities die cuts from black cardstock
(1) 4" x 4" piece of each color (strawberry slush, pool party, crisp cantaloupe and so saffron)

Next I stamped the trio of poppies with stems several times in black on each white piece.  I embossed them all with clear embossing powder so I wouldn't have to wait to do my coloring, then colored each with the coordinating markers.  (For the strawberry slush panel, I used blushing bride as the main poppy color and highlighted with the strawberry slush marker).  I also added the sentiments at this point.  Three of them are from Joyful Blooms and one is from Poppy Birthday.  When these panels were done, I layered them onto the black scallop rectangles with dimensionals, added a little black liquid pearls to each scallop and set aside to dry.

Next I stamped the three sizes of lined poppies tone on tone on each of the four colored card stock squares for a fun background.  A seam binding bow from the Black Beauty Ribbon Collection is tied around each panel and then it was simply a matter of layering all my pieces together.  Super quick - it took me about 45 minutes from start to finish to make the whole set, which is about all the attention span I have for mass production!  {grin}

Alrighty, thanks so much for stopping by today!  I've got another card up on the Verve Blog today, too! Time to move along and see what gorgeous creation Amy Kolling has to share with you!  Happy Hopping!  Oh!  And if you're in the market for some holiday stamps, Verve has a 25% off sale on our holiday stamps & dies this weekend only!

1. Julee 10. Marisa
2. Amy 11. Teresa
3. Betty 12. Maureen
4. Jessica 13. Charmaine
5. Karen 14. Christyne
6. Sankari 15. Andrea
7. Sarah 16. Amber
8. Susan 17. Stacey {Guest}
9. Tiffany
Enabler's List
Stamps: Poppy Birthday, Joyful Blooms (Verve Stamps)
Paper: strawberry slush, pool party, crisp cantaloupe and so saffron, basic black (SU!), white
Ink: black, strawberry slush, pool party, crisp cantaloupe and so saffron, blushing bride, cameo coral, coastal cabana, crushed curry, wild wasabi (SU! inks and markers)
Accessories:  Black Beauty Ribbon Collection (Verve), Scallop Rectangles Nestabilities (Spellbinders), liquid pearls (Ranger)