Powered by Blogger.

You're Amazing

Hi friends! Today I have a fun card to share using scraps.  After I had finished packing away all the Valentine's goodies in my craft room, I found a small pile of scraps that had fallen out of a 12 x 12 pad on the floor. They were so lovely that I decided to cut them down to card front size to keep a stack of on my desk.  Then I had even more left overs, so I decided to tear them in strips and layer them together to make a fun backdrop for a card.

Handmade card by Julee Tilman www.poeticartistry.blogspot.com

Next I cut a doily from one of the papers and then stamped the you're amazing sentiment from Small Phrases and cut with a circle die to layer in the center of the doily.  I grabbed a piece of leftover ribbon that was a freebie with an order at The Funkie Junkie and dyed it a bit more yellow with some  shimmerz sprays.  The base of the card is splattered with different shimmerz inklingz and also some of the rose gold watercolor from Designs by Rachel Beth.  I finished off with a little birdie ephemera piece and a couple paper flowers from my stash.

Handmade card by Julee Tilman www.poeticartistry.blogspot.com

Thanks so much for stopping by today! I hope you have a fantastic day!

Enabler's List
Stamps: Small Phrases (Verve Stamps)
Paper: In Bloom (My Mind's Eye), white (Neenah)
Ink: pumice stone (Ranger Distress), Miner Miner 49er, Burnished Buckle Inklingz, Egg Noggin' and Glorious Day Vibez (Shimmerz), Wild & Free watercolor collection (Designs by Rachel Beth)
Accessories: Doily punches die (Lifestyle Crafts), circle die (Nestabilities), seam binding, Botanicals ephemera (Tim Holtz), paper flowers

Wishing You a Pot of Gold

Hi friends! I'm having a hard time wrapping my head around the fact that February is almost over. This year seems to be flying by. Today I'm sharing a card I made with the Lucky Day DIGITAL Set. This set was available for a limited time last year and is back in the store now and on sale!


One thing I really enjoy about digis is the ability to foil the designs.  Here I printed the PDF version of the digi on watercolor paper, then foiled the sentiment in my mini MINC. Another little trick I love to do is use the leftover foil from the foiling to add little accents to my project. It's so easy. I just randomly use a glue stick on places I want gold foil, then apply the leftover foil pieces and rub gently to leave a shiny little bit of gilding behind. I did this for the frame around the card and on the top of the clover.  I tried super hard to capture the shine in a photo, and this was my best take.  I do love the glow, don't you?


The aqua wash and the clover are watercolored with Shimmerz products. I fussy cut the images and then added a little distressing to all the edges before layering it all together. Such a fun card to make!


 Thanks so much for stopping by today! I hope you have a fabulous day!

Enabler's List
Stamps: Lucky Day DIGITAL Set (Verve Stamps)
Paper: watercolor paper, white (Neenah)
Ink: laser printer, Ocean Tonez and Earth Tonez (Shimmerz), white Bombay India ink (Ph. Martins)
Accessories: gold foil, Mini Minc machine (Heidi Swapp), planner glue stick, paper distresser (Prima)

Keeping Christmas with Glad Tidings

It's the 25th of the month and time to join some of my crafty friends for our monthly Keeping Christmas Inspiration Hop! The idea of the hop is to bring you a little inspiration throughout the year and also have some Christmas cards and projects in our stash all ready to go for December 2018. If you've already been hopping along, you should have arrived from Claire's blog. If you're just popping in, read on for all the details!


Confession time. No matter how on top of things I felt in January, February is down in the trenches real life around these parts. So as I was sitting in a bookstore in between birthday parties yesterday afternoon and happened to flip through a magazine that had a Christmas card in it, I thought, "I should totally start working on my Keeping Christmas project for this month." Then I panicked... "is today the 25th? Mark, what day is it? Is it the 25th? Oh good, it's ONLY the 24th!" Man, did a month fly by quickly, or what?! So after we got home late last night I started my last minute Christmas project. I guess a little late night stamping each month beats nights and nights of it in December!  LOL


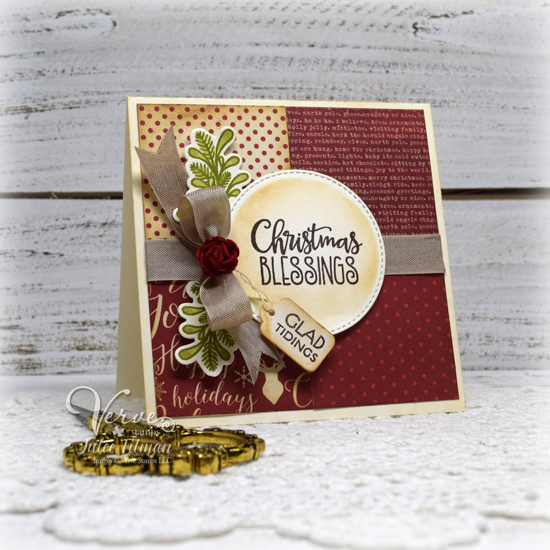
My go to when I'm crunched for time is a square card. I really like how easy layouts come together in this size. I typically make my square cards 4.25" x 4.25" so they can fit in a regular A2 envelope. I  knew I didn't want to dig in the back of the closet to get the Christmas papers I packed away and risk waking up the twins, so I decided to pull out my box of Christmas scraps. I sort my holiday scraps by color... mostly red, mostly green, mostly neutral, or non-traditional piles. The reds called to me, and I started by cutting 2" squares out of four different scrap papers. I sponged lightly around each square with antique linen  and vintage photo distress ink, then sticky taped them together in a square formation.

Handmade Christmas card by Julee Tilman www.poeticartistry.blogspot.com

Next I cut two stitched circles and left the die cut in the die to use as a stencil to sponge a nice soft glow of antique linen around the inner part of the circle. This is a great way to get the contrast effect of a mat without adding an extra layer of cardstock, plus it can really add a lot of depth to your project. I chose two different sentiments from the Beyond Measure stamp set for my similar but different cards. Next I cut the leafy branch die from the coordinating Christmas Spirit Die Set four times and used the MISTI to line them up easily and stamp with moss ink. I watercolored with the same ink just to fill in the leaves.  Then I added some seam binding and paper flowers and layered it all together.  I felt the Christmas blessings needed a little something more, so I took a tiny distressed tag from my stash and inked up the glad and tidings words separately to fit it, before adding to the project.

Handmade Christmas card by Julee Tilman www.poeticartistry.blogspot.com

So there you have it, my February last minute installment for Keeping Christmas. Hope you enjoyed it! If you're looking for some new Christmas stamps, Verve's Christmas products are 25% off today only (2/25/18). 

Okay, now it's time to hop along and check out all the other fabulous posts on the hop. I'm so excited to hop along and see everyone's creations! The hop is hosted on the fabulous Kelly Lunceford's blog, so head over there to start from the beginning. Or continue on to visit Kim Heggins if you've already been hopping along!


Julee Tilman {You are here}


Enabler's List
Stamps: Beyond Measure (Verve Stamps)
Paper: various designer papers, cream (Neenah)
Ink: early espresso (SU!), antique linen, vintage photo distress (Ranger), Moss (Altenew)
Accessories: Christmas Spirit Die Set (A Cut Above by VERVE), stitched circle dies, seam binding, paper flowers, vintage tag, MISTI, seam binding (SU!)

Oxide Smiles

Hi friends! Today I'm sharing a fun mixed media card I made with couple of the new Distress Oxide colors. Blueprint Sketch and Shaded Lilac were calling my name, so I swiped and spritzed on acetate and smooshed on cardstock and then smooshed some more. A bunch of times, because it's all about the layers!


I also flicked on distress paint in blueprint sketch and white india ink for a fun splattery look.  The sentiment is from Better Together and embossed in white directly on the watercolored panel.  Next I dry brushed some of that blueprint sketch distress paint on cardstock, flicked with white india ink and cut with the Butterfly Dreams Die Set, for a fun matching butterfly.

I'm on a mission to use some of the tote bags full of flowers I've been hoarding over the years, so pulled out a few that happily matched the colors in my project and started layering.  I added a bit of twine, some prima leaves and then filled in with leaves cut with the Butterfly Dreams Die Set.  My final accent was some distressed edges and a bunch of navy pearls from my stash.


Thanks so much for stopping by today! I've been taking a bit of a creative break lately, just playing around with new products, but not stressing about creating finished projects. I'm sure there will be a flood of new projects soon, though, because I'm starting to feel creative again.  Hooray!

Enabler's List
Stamps: Better Together (Verve Stamps)
Paper: distress watercolor cardstock (Ranger), white
Ink: blueprint sketch, shaded lilac distress oxide (Ranger), blueprint sketch distress paint (Ranger), white bombay india ink (Dr. Ph. Martin's), VersaMark (Tsukineko)
Accessories: Butterfly Dreams Die Set (A Cut Above by VERVE), prima flowers & leaves, pearls, linen thread, glitter glue

Valentine Nugget Treat Bags

Hi friends! This morning I was looking for something on my computer, and I came across a folder entitled "Not Yet". Apparently on an organizing kick one day, I put all the photos of projects I hadn't blogged yet in a folder and then promptly forgot about them! There do seem to be a few little distractions in my life these days!  Anyhow, to my surprise I discovered these Valentine's Day treat bags I made very last minute last Valentine's Day for the boys' teachers.

Valentine Hershey Nugget Treat Bags by Julee Tilman www.poeticartistry.blogspot.com
I have always loved little Hershey nugget gifts. Even though they've been around for years and don't take much time at all, the recipients always seem so genuinely amazed by a bit of paper wrapped around a Hershey bar! {grin} The magic of stamping, right?

The papers I used for these are the Be Mine collection from Echo Park. It's been a favorite of mine for several years. I was happy to spy a bunch of collections of it at Tuesday Morning just this week, so you might still be able to find it.

I started by cutting strips of two different designs of Be Mine paper to cover the Hershey's Nuggets. I cut a 12" x 3 1/4" strip, then ran a line of sticky strip down one of the 12" edges with the design side up. Next I cut the strip into 1 1/8" sections and since they've all already got sticky strip on, I just had to pull off the covering on the sticky strip, wrap the paper around the nugget and seal. So much faster than adding adhesive to each wrapper individually! Once my nuggets were all covered, I started on the bag topper.

Valentine Hershey Nugget Treat Bags by Julee Tilman www.poeticartistry.blogspot.com

For this particular bag I used a 4" x 4.5" a rose red cardstock piece, folded in half at 2" for the base layer. Next I stamped the 1.5" x 4" strips of white cardstock with the sentiment from More than Love. I matted this with a black mat, then cut some patterned paper pieces to use as accent.  The die cut hearts are cut with the Heart Quartet Die and then all layered together.

The bottom side of the card is stapled to the bag on each side, then I tied a bit of baker's twine around the top and secured the top flap with a piece of removable tape.

Enabler's List
Stamps: More than Love (Verve Stamps)
Paper: Be Mine (Echo Park), rose red, basic black (SU!), white (Neenah)
Ink: onyx black (Versafine)
Accessories: Heart Quartet Die (A Cut Above by VERVE), baker's twine, Hershey nuggets

Shabby Love

Hi friends! I'm back with another shabby chic card. When I saw the current inspiration photo at The Card Concept, I just couldn't help but reach for the new Love Story collection from Prima. It seemed the perfect fit. On a recent shopping trip to Tuesday Morning, I found this Love die and some bird embellishments, so I knew I had to find a way to incorporate them as well.


I started with a watercolor tag from Prima, watercoloring with the same watercolors I used in yesterday's card, then die cut the word Love from the center. I splattered some white and black indi ink and set aside.  Next I cut the love word again, then watercolored softly with the rose gold and inlaid.

This paper seemed to match the flowers in the photo, so I chose it as the backdrop, then started layering flowers from my stash.  I added some gold rose watercolor paint to some of them, then started in on the bird element.  It started out as a shiny silver bird, so I first coated it with a layer of heavy gesso, then added a whole lot of different colors of Finnabair wax to achieve the look I wanted.  I finished off with some white leaves, dusted with more of the rose gold watercolor and some vintage silk wax.


Thanks so much for stopping by today! Hope you have a fabulous day!

Enabler's List
Paper: Love Story (Prima), watercolor tag pad (Prima), white (Neenah)
Ink: Wild & Free watercolor collection (Designs by Rachel Beth), bombay india inks (Dr. Ph. Martins)
Accessories: flowers & leaves (Prima), Live Love Laugh die (Momenta), Salvaged stamped metal bird (BCI Crafts), paper distresser, vintage silk, white gold, rich copper, brushed iron Finnabair wax (Prima), hot glue gun
A Year of Joy

Hi friends! Welcome to another week! I had to take a short break from shabby chic cards to make a birthday card for my Dad. We had a joint birthday/Valentine celebration for him and hubby yesterday, since their birthdays are Feb. 14 and 15.  My Dad loved this card. He just turned 75 and it was fun to see the delight in his eyes as he paraded the card around to everyone to show them the "special" card I'd made. I think that right there is why I love cardmaking so much.. the delight it brings to the recipient.


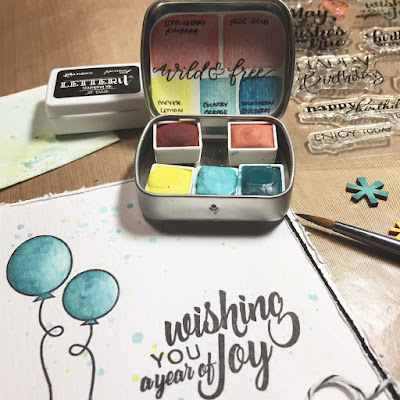
Anyhow, I recently found a local artist that makes handmade watercolors and I had to give them a try. I love supporting handmade and local and these watercolors are such a treat. Packaged so sweetly and super fun to play with, with rich, creamy pigments. I may have *had to* help hubby out with my Valentine's present by ordering some more for myself from her etsy shop over the weekend!  LOL


I started by stamping the balloons from Birthday Bash in archival ink, then watercoloring with the two aquas. I like to keep colors simple for my dad, since he is red/green color blind.  I then made some rough masks for the balloon sections and splattered the two blues and the yellow over the whole panel.  Next I stamped the sentiment from Cake & Candles on the side and then accented with a bit of baker's twine. Next I watercolored two little wood confetti stars, then coated them with nuvo drops and layered together to accent the string.  A bit of black behind the side adds a bit of interest and also hides that my watercolor paper and card base aren't quite the same color of white. (twitch, twitch)


And there you have it, a simple and quick masculine birthday card.  Thanks so much for stopping by today. I hope you have a fabulous start to your week.

Enabler's List
Stamps: Birthday Bash, Cake & Candles (Verve Stamps)
Paper: watercolor distress cardstock (Ranger), white (Neenah), basic black (SU!)
Ink: letter-it black archival (Ranger), Wild & Free watercolor collection (Designs by Rachel Beth)
Accessories: baker's twine, wood veneer confetti stars, nuvo drops, paper distresser

Kindness Cup

Hi friends! Confession time... I *may* have gone a little bit crazy when the new Prima collections came out. I seriously had to have them all, and now I have an entire box full of Prima lovelies that I just want to sit and stare at all day! I just keep pulling them out and flipping through them and then not actually getting anything made! LOL I'm really hoping to make some mixed media canvases soon with some of the goodies... if I can ever stop staring and start creating! {grin}


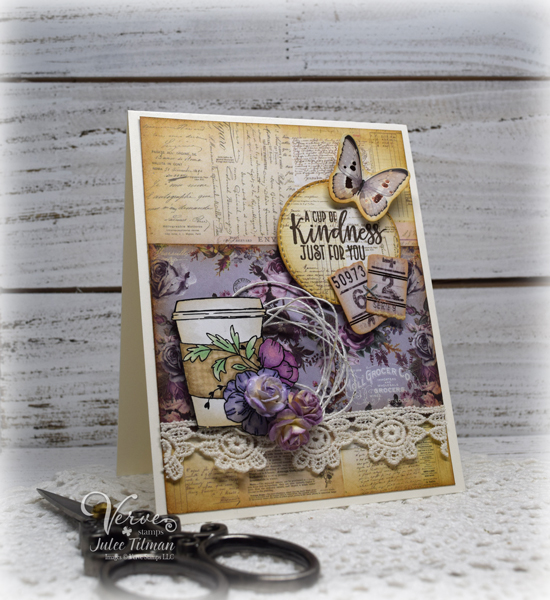
Anyhow, judging from the sheer amount of Prima paper and ephemera on my desk right now, I'm thinking you're going to be seeing quite a bit of shabby chic creations from me for quite some time.  The Lavender collection brings back fond memories of my Grandma who loved lavender.  Although I really like purple, I rarely have found any purple papercrafting products that I like as much as this collection.  So here's a shabby little card I put together with an image from the Graciellie Design digi I used on yesterday's card and a sentiment from the Coffee Helps clear stamp set that just arrived back in stock.


The image is printed on a laser printer and colored with Copic markers.  I fussy cut it, then accented with a bit of string and a few little mini roses.  I selected a couple of papers from the Lavender 6 x 6 pad, then sponged with first antique linen and then vintage photo.  The sentiment is from Coffee Helps, stamped in early espresso and cut with a stitched circle die cut.  I finished with a bit of lace,  butterfly and ticket ephemera and a bit of foil accents rubbed onto the twine.

Thanks so much for stopping by today!

Enabler's List
Stamps: Coffee Helps (Verve Stamps), Coffee & Love (Graciellie Designs)
Paper: Lavender 6 x 6 pad (Prima), white, cream
Ink: laser printer, early espresso (SU!), antique linen, vintage photo (Ranger Distress), markers (Copic)
Accessories: Lavender Ephemera (Prima), twine, flowers, lace, foil, stitched circle die, tiny attacher

Coffee and Love

Hi friends! Welcome to another Monday.  The boys are healthy and in school and I'm sipping an Americano, listening to some soft jazz , editing photos and packaging a restocking shipment of dies this morning. A pretty good start to the week!


Over the weekend, I took a little bit of me time and hit the stamp studio armed with the beautiful new Coffee & Love digital set from Graciellie Design.  I just couldn't wait to color the beautiful flowers and to go cup.  I  imported the individual files into a photo editing software and resized the cup photo to 3" wide, I then added the sentiment, resizing to 1.125" wide, and added a solid 1.5" circle and an inner 1.375" stitched circle, then filled in  the sheet with some of the other sentiments and multiples of the mug before printing on cardstock with a laser printer.

All the coloring is done with Copic markers, and I colored and cut one additional flower image from one of the multiples I had printed, and popped it up to add a little dimension.


I was inspired by the inspiration photo at The Card Concept. Love the look of flowers and wood grain and that combination always makes me think of shabby chic. I pulled in the woodgrain with a bit of Prima Rose Quartz paper and also added in some highlights to the java jacket, giving it a bit of a woodgrain look as well.

The sentiment is lightly sponged with milled lavender and dusty concord distress inks, as is the today 3X4 journaling card from Prima's new Lavender collection.  I added a doily, a rhinestone flourish as the steam and finished off with a bit of glitter and a twine bow.

Thanks so much for stopping by today! I hope you have a wonderful start to your week!


Enabler's List
Stamps: Coffee & Love Digital Set (Graciellie Design)
Paper: rose quartz 6 x 6, lavender 3 x 4 (Prima), crumb cake (SU!), white (Neenah)
Ink: laser printer, Copic markers, milled lavender, dusty concord, hickory smoke, black soot (Ranger Distress)
Accessories: circle dies, glitter, doily, natural twine, rhinestone flourish, corner rounder, paper distresser

With All Your Heart Viva la Verve

Hi friends! It's the first Friday of a new month and that means its time for a new card sketch from me over on the Viva la Verve blog.


My sample card uses a sentiment from the Love From Me DIGITAL Set.  I had some fun with designer paper, matting everything with espresso, because it's like enveloping something in LOVE.  {grin}

The digi sentiment is printed on my laser printer on white cardstock, then colored with Copic markers and accented with glossy glaze and glitter.  The heart border is one of my favorites from the Scalloped Trim Trio Die Set and I used some of the remaining heart cut outs to spruce up my aqua panel.  Finished off with some liquid pearls on the scallops and a seam binding bow.


Thanks so much for stopping by today! I hope you enjoy the sketch this month and can find a little time to join us.  I've added the measurements I used to the sketch if you like to have them, but feel free to make it your own!

Enabler's List
Stamps: Love From Me DIGITAL Set (Verve)
Paper: Forever My Always (Pebbles), darling (Authentique), early espresso (SU!), white (Neenah)
Ink: laser printer, copic markers
Accessories: Scalloped Trim Trio Die Set (A Cut Above by VERVE), stitched circles die set (Cottage Cutz), scalloped circles nestabilities (Spellbinders), seam binding (Hug Snug), nuvo drops (Tonic), chocolate liquid pearls (Ranger)

How Sweet It Is

Hi friends! Happy February! Today I'm sharing a sweet little card I made for the Inspired By All The Little Things challenge. The fun photograph made me think of the how sweet it is to be loved by you sentiment in the Love Everlasting set, so I pulled that out to get started.


I stamped the sentiment several times in Sage Shadow with my MISTI for full coverage and then once in Versamark and embossed with clear embossing powder. Next I wanted to add in some of the texture I was drawn to on the cookies, so pulled out a couple embossing folders. I embossed just the side of the sentiment panel with one, then embossed the larger background piece with another.


Then it was just a matter of pulling together some flowers, lace and a little seam binding bow to finish things off.

Thanks so much for stopping by today! I hope you have a fabulous start to the month!

Enabler's List
Stamps: Love Everlasting (Verve Stamps)
Paper: julie nutting (Prima), white
Ink: sage shadow (SU!), versamark
Accessories: rectangle from Falling Leaves Die Set (A Cut Above by VERVE), flowers (Prima), lace, seam binding, embossing folders (Cuttlebug)