Do you ever have a project in mind that you just can't get out of your head? A few weeks ago I watched a video from Cathy's Garden on YouTube sharing her formula for creating stuffed pockets. I love little tags and such and just couldn't stop thinking about how her idea would look as a Valentine project. Enter the gorgeous new Sweet Valentine papers and ephemera from Not 2 Shabby! As soon as I got them in my crafty little hands it was off to the races! 😁
I started out making the main pocket. I knew I wanted my back tag to be a full 6" tall and I wanted all the main pieces to be from my 6x6 patterned paper, so I tweaked the pocket just a bit.
To create the pocket, I started with two 4.5" squares of the Sweet Valentine paper. Next I punched a half circle out of the top center of the front panel and inked up the edges of both panels for a vintage look. inked up the edges, and then adhered together on three sides with double sided tape and a little liquid adhesive.
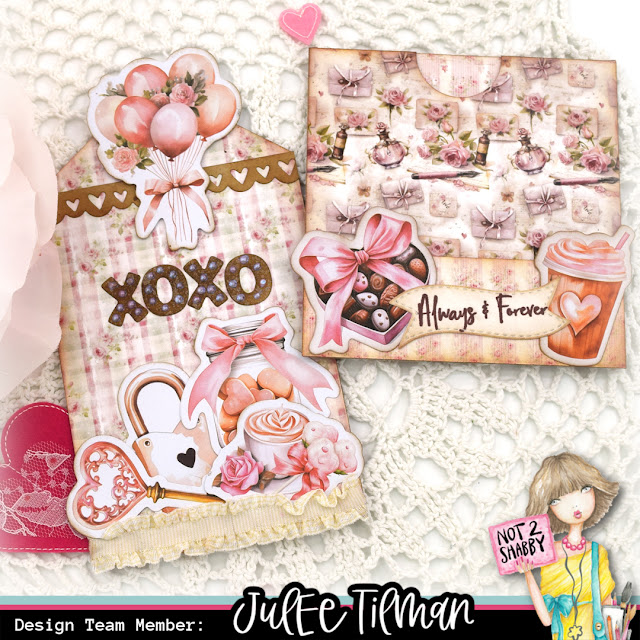
For the main tag I cut the paper to 3.75" x 6", then hand trimmed the angled edges on top. If you're not exact with the angles it's totally fine. You can cover it up with your ephemera or stamped images! To decorate the tag, I collaged a few pieces of the gorgeous Sweet Valenine Ephemera together, then covered the bottom edge with some ruffled ribbon from my stash. The XOXO letters are cut with the Emily's Alphabet Die Set from brown paper bag cardstock, then inked with distress ink and accented with some pearl Nuvo drops. I added a heart scallop border from my stash up top for some contrast and popped the balloon ephemera up on dimensional foam to finish the tag off.
I used Cathy's technique of glueing the pieces of ephemera and a sentiment banner together first, then only attaching on the right and left sides so I could stuff more tags in the pocket. The sentiment is from the December Stamp of the Month, Always & Forever.
Next I got to my favorite part... creating little tags. I cut the two larger tags with dies from my stash, modifiying their heights just a bit by partially die cutting the bottom edges. One uses a sentiment diecut I had in my leftovers pile from last year's valentines. The second one uses the adorable cupcake ephemera from the pack, popped up on dimensionals. I added a bit of ink blending to all the edges then added some seam binding and twine to the tops.
I had a paper scrap left over that was about 1.25" by 4", so decided to make it into a skinny tag. I rounded one edge with a die, then rounded the corners of the other end. The special definition block is a printable I got from Etsy, printed and then added to the tag to finish things off.
Once all my pieces were done, it was just a matter of tucking them into the base pocket. I absolutely loved how quickly this came together and am so happy with how it turned out. Thanks so much for stopping by today! I hope you've been inspired and have a wonderful day!


1 comment
I can see why you had to have them, gorgeous papers and elements. Beautiful card and tags. x
Post a Comment