Powered by Blogger.

Better Late Than Never

Greetings from Las Vegas! We went and saw the Phantom of the Opera at the Venetian last night and it was AMAZING! The sets, the chandeliers, the performances were all just stellar.

I meant to have this posted first thing this morning, but things never really go as planned, especially on vacation. The card was my take on the Gettin' Krafty Project Parade Challenge that ended today. I finally got one of those paper corrugator crimper thingies (you know, the ones that were popular like 6 years ago? LOL). I've always wanted one, so I finally splurged. Doesn't it look cool on the Baja Breeze? I went with a sand & sea color pairing, inspired by the kraft paper and added some glassy pebbles and some hemp as accents.

What's in it?
Stamps: Petals & Stems, So Happy (Verve)
Paper: Kraft, Chocolate Chip, Baja Breeze
Ink: Baja Breeze, Close to Cocoa, Kiwi Kiss
Accessories: hemp, long scallop rectangle nestabilities, paper crimper, Dew Drops, page pebble, Stardust Stickles

Mojo Monday Week #55

Happy Monday, everyone! Thanks to everyone who played in last week's challenge. I'm on vacation all week, but scheduled a new Mojo Sketch so y'all would have something to do while I'm gone. Hopefully this posts on the right day.

To play along with this week's challenge, just make a card using the provided sketch and leave a comment on this post with a link to a photo of your creation. There is no time limit - you can play any week at any time. If you happen to upload to SCS, please use keyword Mojo55 so we can see everyone's mojoliciousness all in one happy place.

The sketch is square, which always makes me happy. Those are my favorite kinds of cards. I make most of mine 4.25" x 4.25" square so they fit in a regular 4.25" x 5.5" envelope and don't cost any extra to mail. The little half square/triangle thingy is optional. I clipped the ends of my panel, but also thought just a triangle there would look kind of cool, too.

My sample card features the Arrgh! Piratey! set by The Cat's Pajamas again. I just love these pirate stamps! I started by stamping the ship in Memento Rich Cocoa ink and then shading with Copic markers. I masked just the bottom of the boat and stamped the wave stamp repeatedly. The sentiment panel I sponged the edges with soft blue and clipped the ends to kind of mirror the flag in the stamp. I even secured the sentiment with pop dots, so that it curves out a bit, instead of just lying there flat.

The patterned paper is from the BasicGrey offbeat collection and the background is reverse embossed with the D'vine Swirls Cuttlebug folder.

I hope y'all have a fabulous week!

You Are A Treasure

Happy Saturday! This week's Our Creative Corner challenge is hosted by Amy Sheffer and there's a cool prize being offered up by our Guest Designer, Michelle Rodgers of Stamper's Dream. Check out all the challenge details and the gorgeous cards by Michelle and the OCC girls on the Our Creative Corner blog.

This week's challenge is to use any kind of stitching on a card, as long as it's not white stitching. Well, my Janome sewing machine has been on the fritz and is dropping stitches. And since the reason I bought the machine was for my stitches to look professional and not homespun, I decided to go with faux stitching for this challenge. My card features the new Arrgh! Piratey! set from The Cat's Pajamas and lotsa lotsa faux stitching. ;)

I hadn't made a gate fold card in a while, so I decided it would be a cool thing to do with a treasure chest stamp. Kind of like finding buried treasure. LOL! So I pulled out my Scor-Pal to score the lines and then stamped the chest in Memento Rich Cocoa on Classic Cream cardstock. Next I colored with Copic markers and Spica Glitter pens, then stamped all around the panel with the skull & crossbones. I sponged the edges with two different shades of Ranger Distress Ink (Vintage Photo and Walnut Stain, I think), then I pierced holes all around the edges and connected with a brown marker for some faux stitching. I liked the look so much, I decided to continue it on all the panels on the card. The sentiment is stamped with Versafine Crimson Red ink and I used the small compass stamp around the outer edges. For the closure, I just punched some circles and attached a BasicGrey magnetic snap to the circle. I made an identical circle and magnet for the other side of the card, so they snap together to keep the card closed.

I decided to go for a treasure map look once you open the card, so I stamped the skull & swords stamp in Crimson Red Versafine ink in the corner, then used a pen to draw a little stitched border around the inner edges. I finished off with some more sponging for that nice vintage look, and voila!

I adore these pirate stamps, and you can pick them up with a couple other holiday TCP sets right now for dirt cheap. Just look for the Kitty Kat Pack to save $15, and be sure to say hi to Alma for me! :)

Cap'n Sprinkle

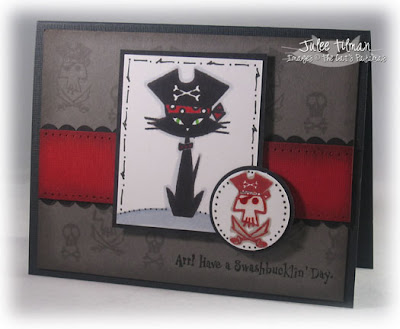
Happy Friday! Today's the release of three new sets from The Cat's Pajamas. My all-time favorite pirate stamps have been combined into one fantastically clear set, and then there's a Swanky Halloween set and a Christmas fairy set. And for a limited time you can get all three sets (a $54 value) in the Kitty Kat Pack for $39! So what are you waiting for? That's a big ole' whopping good deal! The money you're saving could buy you a whole other $15 set! Woohoo!

My card today features the Arrgh! Piratey! set, as well as my favorite feline (in stamp form), Big Sprinkle, from the It's a Mod, Mod World set.
I started by stamping the Swabby Hat in Versafine Onyx Black, masking off just the bottom part of the hat and stamping Big Sprinkle. Next I shaded and colored with Copic markers and added a little ground for Cap'n Sprinkle to be sitting on. I doodled in a frame and matted on black. The Skull & Swords is stamped in Versafine Crimson Red and punched out with circle punches. I shaded with a gray marker, and then added some crystal effects to the image for a glossy look and a black dotted border. The background for the card was made by aligning the two skull stamps on an acrylic block and stamping repeatedly across the grey cardstock in Versafine Smokey Gray. Next I cut a strip of red, inked the edges with Smokey Gray and pierced holes along the top and bottom edges. The scallop border is made from a Long Rectangles Nestabilities shape that I removed some of the middle section from, to be the right width for my panel.I finished off by adding some more gray sponging on the gray layer and adding the Arr! Have a Swashbucklin' Day sentiment in the corner.

Hope y'all have a swashbucklin' good day! I'm hectically running around trying to get all the last minute details taken care of before we leave for our weeklong vacation. Woohoo! Hopefully I'll find a little time to schedule some posts before I leave so you've got something to look at for the next week. ;) I'll be back tomorrow for the Our Creative Corner challenge before we head out of dodge!

One-eyed, One-horned Flyin' Purple People Eater

Happy Thursday, everyone! Well, what's left of it, that is. My day didn't go as planned (do they ever? LOL), and so even though I made this card first thing this morning with every intention of immediately blogging it, life got in the way. I had a dentist appointment, then when I got home, my internet connection was dead. By the time I got it working again, the obligatory migraine I get every time I get my teeth cleaned set in. So now, after downing some medicine and hiding under a pillow for a few hours I'm attempting to upload the card. This one is for the new Meet The Verve Divas challenge that started today. This week's hostess is the uber talented Jen del Muro, so be sure to stop by the forum and get to know her.

Her challenge is to use purple on your project. I really like purple in real life, but haven't found a paper crafting purple I can embrace. It seems that the real-life purple I know and love just doesn't translate to paper and ink. And it definitely doesn't photograph well. I had a doozy of a time with the photo. The colors in the photo are all wrong. *sigh* The different shades of purple really do all play very nicely together in real life.

I started with this week's SCS sketch and some papers from the Katlin Crate Paper Collection, but I strayed a tad from the sketch. These are matted with Eggplant Elegance. Next I stamped the flower from Beautiful You in Versafine Imperial Purple ink and colored with Copics. For some reason I felt like doing an out of the box treatment with the flower, so I only trimmed out half the flower and then added some Purple Spica Glitter pen dots for interest. The sentiment is from Anniversary Birds and is stamped directly on the DP. The back layer is Always Amethyst, which was stamped repeatedly with the Beautiful You flower and then colored with Copics. I finished off with some purple bling in each of the corners of the panels, as well as some Stardust Stickles on the flower center.

Okay, back to hiding under a pillow! Catch y'all tomorrow! :)

OCC CASE Challenge

The Our Creative Corner gals decided to have a mid-week challenge just for fun. The challenge is to pick out a card from one of the OCC Girls and CASE it. {Links to the blogs of each of the OCC girls are on the right side bar.} There's a giveaway with the cutest snowman papers EVER, so be sure to check out all the details on the OCC Blog.

For the challenge, I chose to CASE this card by Cindy Haffner. I think I've been a fan of Cindy's as long as I've been on Splitcoast. Back when I still had time to do the daily challenges, I faithfully ogled each and every one of her creations each day on the challenge threads. In fact, I think her work has done more to enable my craft spending than any other stamper I know. :) I so admire her style which is well layered, perfectly embellished, detailed... and BEAUTIFUL!

Well, this card was a little more involved than I usually go, but it was a lot of fun to make. I wanted to use a card with a tag, since it's the last day to enter Laura's Meet The Verve Divas challenge to use a tag on your project. The designer paper is from the Fancy Pants The Daily Grind collection. The pieces on the card used both the classic and scalloped rectangles, the classic and scallop squares, and a tag die all from Nestabilities. The Tangerine Tango background is embossed with the Spots and Dots folder and the bottom edge is punched with the SU! scallop border punch. The blue matting is Pacific Point. I stamped the flower circle from Abundant Blessings in Tangerine Tango and then sponged the edges with So Saffron, Pumpkin Pie and Tangerine Tango. The tag is stamped with the So Happy sentiment set and then chalked with Pumpkin Pie and So Saffron Stampin' Pastels. The ribbon is Soft Sky double stitched ribbon and I layered two primas from my stash. I finished off with tons of little dots with my Signo white gel pen, some orange bling and some Stardust Stickles on my main image.

Okay, thanks for stopping by. Hope you have a fantastic day!

Eastern Blooms


Today's card is one I made while playing with my new Stampin' Up goodies. I started by inking up the branch from the Eastern Blooms set with Chocolate Chip and Ruby Red markers and stamping on white cardstock. Next I added some color to each bloom with a Pumpkin Pie marker and a little shading to the branch with a Going Gray marker. I stamped just the one flower from the trio of flowers stamp and then added color with a Pretty in Pink marker before cutting out. Although you can't really tell from the photo (still trying to figure out the new camera), the flower is popped up on a dimensional next to the Best Yet sentiment.

The designer papers are from the Bella Rose DSP pack and everything is matted with Basic Gray cardstock. I added a few piercings, a little sparkle with some Crystal Effects/Dazzling Diamond mixture, then added a little Riding Hood Red Taffeta knotted bow with a hodgepodge clip glued below it with Crystal Effects. And for the finishing touch I stamped the branch again in the corner of the inside of the card.

Moments

As promised here's the photo of my sample card for this week's mojo sketch. To make the triangle piece, I simply took a 4.25" square of designer paper, cut in half on the diagonal and glued one of the pieces to the corner. The rest is kind of standard stuff, so I won't bore you with too many details. The dp is all from Heidi Grace. The mats are Chocolate Chip cardstock and I used the SU! scallop border punch for the scallop edge. The ribbon is some new American Crafts ribbon I picked up at Archiver's.

I stamped two of the fern branches from Abundant Blessings randomly in Kiwi Kiss on white cardstock. Next I embossed the sentiment from Beautiful You in copper on Vellum and cut a little shorter than the leaves panel. I finished with three copper XL eyelets from We R Memory Keepers down the side, then added some liquid pearls to each of the scallops for a little accent.

So, have you heard about Cammie's Heart To Heart Blog Candy for Alzheimer's Awareness? Well, if not, she's holding a ginormous blog candy giveaway with a HUGE prize (over $1000 worth of merchandise). Verve Stamps donated several sets for the giveaway, including the two sets I used on this card. All you have to do is make a card and send to the caregiver of an Alzheimer's patient. This is such a tragic disease, and every 72 seconds another person develops Alzheimer's, so chances are if you haven't already been affected by this disease, it won't be long.

My grandfather suffered from Alzheimer's before he passed away a few years ago. It is a heart wrenching journey to go through for family and caregivers, as well as for the victims of this disease. I truly admire the wonderful men and women who give so much of themselves to care for patients suffering from Alzheimer's. Be sure and check out Cammie's blog for all the blog candy details as well as her stamp set, Whimsical Autumn, which she donates 100% of the proceeds received to the Alzheimer's Foundation.

Mojo Monday Week #54


Happy Monday! Did the weekend fly by or what? It's already time for another Mojo sketch! This week I did make a sample card, but I'm just too tired right now to try to figure out my new camera to take a picture of it, so it will be coming later. :)

To play along with this week's challenge, just make a card using the provided sketch and leave a comment on this post with a link to a photo of your creation. There is no time limit - you can play any week at any time. If you happen to upload to SCS, please use keyword Mojo54 so we can see everyone's mojoliciousness all in one happy place.

That's all for now folks! Hope everyone has a fabulously creative week. Can't wait to see what y'all do with the sketch.

Some Bunny Loves Chipboard

Happy Saturday! It's time for another Our Creative Corner challenge, and this week, Amy Sheffer, our September hostess, set this week's challenge to use chipboard somewhere on your project. Check out the Our Creative Corner for all the challenge details and spend a little time drooling over this week's Guest Designer creation, as well as all the fabulous projects from the OCC girls. Then be sure to play along with us!

Now, somewhere in my studio, there is an entire moving box full of chipboard. I know it's there. It's filled with every chipboard shape and letter imaginable. I really had a thing for chipboard about a year ago, but then I lost that lovin' feeling and moved on to something new. Sound familiar? Well, I looked and looked and couldn't find the box. I did find several other very useful and forgotten things, but no chipboard shapes. :( Then I remembered a stash of a few lightweight chipboard coasters I had out from making some magnets a while back, so decided to go with an Anything But A Card project for today's challenge.


I started by cutting a Nestabilities scallop circle out of the lightweight coaster and then cutting a matching scallop circle from my new pad of Fancy Pants The Daily Grind paper. I cut a smaller coordinating scallop circle from the polka dot paper from the same collection. Next I cut and embossed a classic circle and stamped Some Bunny in Basic Gray and colored with Prismacolor pencils and gamsol. Next I cut the same size circle out of Vellum cardstock and embossed the sentiment in Black, then tore away the upper section and layered over the bottom part of the stamped circle, securing with sparkle brads from Imaginisce. Then it was simply a matter of gluing everything down and adhering a Basic Grey magnetic snap to the back to make the top a magnet.

The tin is a Making Memories embellishment tin that I found in a set of 4 on clearance at the LSS. To decorate the sides I simply took an 8" strip of the same patterned paper, used the Stampin' Up scallop border punch on one edge and the secured around the tin with sticky strip. I finished off with some really thing black and white polka dot ribbon from Offray. I filled the tin with mints, thinking it would make a great little party favor for a baby shower. I could also see it as a great little gift for a little person, with a little treasure inside, or a Valentine or holiday treat. And since the top is a magnet, it easily comes off and can be kept as a little keepsake.

Sorry, for missing my post yesterday. I had a card all ready for you, but my camera didn't want to come out to play. The camera has been on it's last legs for quite a while, so Mark & I went out shopping last night and picked up a digital SLR (for you people that know what all that stuff means, we got the Canon Digital Rebel XSi). I've always been a point & shoot kind of gal, so I was really nervous to try the digital SLR with all it's whizbang buttons and gizmos. However, I was able to photograph today's project without any injuries (to me or the camera! LOL), so I think the purchase was a success! LOL

Upsy Daisy

Last night I finally found a chance to play with my new Stampin' Up! goodies. I had Kraft scraps on my desk because I'm still thinking about what to do for the Verve Project Parade challenge, so I decided to use some of those scraps for this card. I haven't had much luck using kraft as an accent color, but my favorite way to use it is to replace the white I usually stamp on. Gives everything a really earthy feel.

I started by stamping the Upsy Daisy stamp in Chocolate Chip on Kraft. Next I used my Stamp-a-ma-jig to slightly offset the second layer of stamping, which I stamped in VersaMark and then embossed with clear embossing powder. Next I stamped a square with the sentiment from Best Yet and then sponged the edges of both stamped panels with Close to Cocoa and then Chocolate Chip ink. I punched a strip of Chocolate Chip cardstock with the new Scallop Border punch and used it to mat the image, then punched a Scallop Square punch to mat the sentiment.

The background piece is Baja Breeze stamped in the same color of ink with the Paisley background stamp. I ran a strip of the 1" stitched Baja Breeze ribbon across the card and then a 1/4" chocolate chip grosgrain strip in the center of the Baja Breeze ribbon. I finished off with a little doodled stitch marks with my white Signo gel pen to match the stitching in the ribbon.

Oh, and don't forget to check out the new Meet The Verve Diva Challenge. This week's hostess is Laura Fredrickson, so stop on by, ask her a few get to know ya questions and check out the challenge for your chance to win some Verve Bucks!

Simple Pleasures

Happy Wednesday! Today's card is another I made with the Floral Whimsy set. I got some Prism cardstock at the LSS the other day because we all know how I can't resist anything aqua. LOL! I'm really missing Soft Sky and this paper is somewhere in between Cool Caribbean and Soft Sky. I really love the color, it's a little softer in real life than it is on screen. I decided to pair it with some olivey Prism paper. (My LSS didn't have the names of the colors there, so I don't know it's true name). It's kind of in between old olive and always artichoke. Love it too.

I wanted something simple and quick so sketched out this layout on the fly. I embossed just 1/2 of the aqua paper with the Swiss Dots Cuttlebug folder, then tied some olive grosgrain around it and knotted. Next I stamped the vase in Soft Sky, then inked up just the side and bottom with Cool Caribbean and overstamped for some dimension. Next I stamped the stems in Old Olive and the buds in Soft Sky and then again in Cool Caribbean. I shaded with Copic markers then cut with a Long Rectangle Nestabilities die. Next I stamped the sentiment in Old Olive and cut and embossed with the Classic Circles Nestabilities die. I left the die on top to mask off the part beyond the embossing and then stamped the open flower bunch in the corner in Soft Sky. I colored with Copics and then added some bling to the flower centers. I finished off by matting both stamped panels with olivey scallop mats (cut with Nestabilities) and added a little Stardust Stickles to the flower buds. Pretty easy - it only took 10 minutes from start to finish! Woohoo!

So, anyone wanna SWAP? My friend Lisa is hosting the first official VERVE Swap over on our member company forum!!! I'm participating, and a few of the Divas have already signed up, too. Come join us! I'm going to try to participate in each group, so everyone who participates will get a card front made by me. Click on over to check out all the details.

Flower Mojo

Happy Tuesday! A little late, but here's my sample using this week's mojo sketch. I pulled out Floral Whimsy and decided on a color combo of Sage Shadow, Pretty in Pink and Basic Gray. No designer paper was harmed in the making of this card! LOL

All stamps are from the Floral Whimsy set. I stamped the vase in Sage Shadow, the flower sprig in Basic Gray and then colored and shaded with copic markers. The sentiment is cut and embossed with the Classic Squares Nestabilities and I outlined the flower sentiment with a Copic marker. I stamped the butterfly on the Sage circle and then stamped it again on Vellum Cardstock. I then colored the underside with pink Copic markers and used the little dot decoration to decorate the butterfly wings, then trimmed it out and popped up on the circle. The background is Pretty in Pink and Sage Shadow run through the Birds & Vines Cuttlebug folder. The inner strip is Basic Grey and I used the Martha Stewart Doily Lace punch, but covered it up so much you can barely see it. I finished off with some Kaiser Craft pearls on the flowers and butterfly body.

Today is the start of the Verve Project Parade, so be sure to check it out for your chance to win some Verve Bucks! The theme this month is Gettin' Krafty! Click this little link for all the details.

Mojo Monday Week #53

Happy Monday! It's been a super busy weekend for me, so I didn't have a chance to make a sample for today's Mojo Monday sketch. I'll try to play along as soon as I can, though. My Stampin' Up! order is scheduled to arrive today, so I'm pretty sure I'll need to take a break and test out my new stuff sometime soon! ;)

To play along with this week's challenge, just make a card using the provided sketch and leave a comment on this post with a link to a photo of your creation. There is no time limit - you can play any week at any time. If you happen to upload to SCS, please use keyword Mojo53 so we can see everyone's mojoliciousness all in one happy place.

That's all for now folks! Hope everyone has a fabulously creative week. Can't wait to see what y'all do with the sketch.

Scrappy Saturday

Welcome to the weekend! Saturday morning means it's time for another Our Creative Corner challenge. Amy Sheffer is our hostess this month, and she gave us a fabulous new sketch to try. Be sure to check out the Our Creative Corner blog for all the challenge details and to see the gorgeous samples made by the other OCC gals. We'd love to have you play along! :)

Since my stamping time has been really limited this week, I decided to do a supah dupah two-fer and combine the OCC sketch with the current Meet the Verve Divas (MTVD10) challenge. This week Amy Westerman is the Diva in charge and her scrap stash challenge is so much fun! Be sure to check it out, there's $15 in Verve Bucks up for grabs! The challenge is to blindly choose 3 papers from your scrap pile and make a card with them. I was pleasantly surprised to find that two of the three papers I pulled out were double-sided, giving me a few more options. These papers would never have come together on my own, but I really kind of like the way it turned out. The yellow is the back side of a flowery orange/red/yellow Tres Jolie pattern from My Mind's Eye, the black & white stripes are from the DCWV All Dressed Up stack, and the blue and brown pattern is from October Afternoon (the backside is orange and blue stripes, so I was pretty lucky to have two sides!)

Next I pulled out my Abundant Blessings set and got to work. I started by stamping the milk jug vase in So Saffron and then stamping the spray in Versafine Onyx Black, Next I shaded the vase with Copic markers, added a little Stardust Stickles to the buds and set aside to dry. I chose to use the yellow paper as my accent color, so I matted the image panel and then made a little sentiment panel with the yellow paper. The sentiment is from the Here For You set. I matted it with the striped paper and cut some flag tails. Next I decided I wanted another mat on the image panel, so I cut a long rectangle with my Nestabilities and then cut out the middle section and pieced it back together to make it fit my image panel. I also used the same long rectangle die to make a thin scallop border for the top of the card with the yellow paper and then added some black satin ribbon at the seam. A few pop dots and two black mini brads finished it off.

I hope you give both the OCC Sketch and the MTVD challenge a try this week! Have a happy and creative weekend!

Happy Friday

Happy Friday! I'm always just so happy when I make it to the weekend, especially on a release week! I'm not quite sure why, because I usually end up working even longer hours on the weekend playing catch-up. But there's just something so exciting about the possibilities of all that could be accomplished during the weekend that just makes me giddy. :)

So today I bring you a happy card. This one uses the You Say It's Your Birthday set from The Cat's Pajamas. Don't you just love this Cogsmo paper from Cosmo Cricket? It's my most favorite birthday paper - good for boys or girls. The Celebrating Penguin is stamped on a square cut and embossed with the Nestabilities classic squares and then colored with Copic markers. I then stamped the image again on the patterned paper and cut out just the balloon to pop up. I added some dots around the square and then matted with more Cogsmo paper and a thin black mat. The vertical layers are all Cogsmo paper matted with black, and the blue layer is embossed with the Dots & Circles Cuttlebug folder. I stamped the little Happy Birthday sentiment and placed it as a little tab under the image square. Everything is matted on a black card base and I finished off with some diamond glaze & glitter mixture to make the balloon sparkle.

Okay, that's all for now, folks. Have a happy Friday!

Some Bunny

Today is Amy Sheffer's birthday, and being on par for me, her card is on time, but her envelope will be quite late. Happy birthday, Amy! Hope you're having a fabulous day!

My card uses a few of the new Verve sets, including the bunny from Some Bunny, the bow, balloon, string and sentiment from Black Tie Birdies and the present from Birthday Surpirse. I started by stamping two bunnies side by side and coloring with Copic markers. Next I stamped the balloon, three bows, and 2 presents on white, colored and cut out (cutting out just the ribbon part of the second present).

I stamped the string, then popped up the balloon, which I covered with Crystal Effects and sprinkled glitter over for some sparkle, and then glued a red bow near the bunny's wrist. I added the blue bows to the girl's hair and the boy's shirt and then popped up the present in front of them. The sentiment is stamped in real red and then punched out with the SU! small oval punch and layered on a chocolate chip large oval punch. The red brads are from Pinkhedgehog. The blue is a scalloped Nestabilities rectangle and the ribbon is a find in the $1 bin at Michael's. What's better for a birthday than polka dots? :) Everything is on a white background embossed with the Cuttlebug Argyle folder.

And since, today is more than just another day, I just wanted to say...

Abundance

Today is Verve Release Day! Five new sets are available in the Verve Store, including Abundant Blessings, which I used for today's card. There's a special discount if you buy all 5 sets together, plus, we also opened up online ordering for Australia, Germany, New Zealand, Sweden and the United Kingdom.

Okay, on with the card. I can't arrange flowers to save my life, so I wasn't really sure what I was doing when I set out to make this card, but I really like how it turned out. I figured I'd just play around and see if I could get the picture in my head out on paper. I started by stamping the three sizes of the flower, coloring with Copics, trimming out and then layering. I added Orange Peel Stickles highlights all over the place and then set it aside to dry. Next I tackled the sprays. I stamped the fern leaf twice on opposite edges and then the spray a few times in Always Artichoke ink.

Next I wanted to use my new Martha Stewart branch punch that Cindy's been using like crazy. So much that I HAD to go buy one of my own. I punched the branch a few times out of scraps of Kiwi Kiss, Old Olive and Always Artichoke and then layered them behind the flower. I then very carefully (since I'd already glued down my leaves) embossed just one end of the paper with the Cuttlebug border strip. I sponged the edges with Creamy Caramel, Close to Cocoa and Chocolate Chip and then tied a Nestabilities tag on with some chocolate satin ribbon from Target. The sentiment is stamped in Tangerine Tango. I finished off with some Stardust Stickles on the branch punches and across the embossed dots, then matted everything on a Chocolate Chip card base.

So, there it is, a beautiful fall card with the new Abundant Blessings set. I think just by changing the oranges to reds you could make a beautiful Christmas card as well.

Birthday Surprise Preview

Happy Tuesday, everyone! Tonight is the Verve Release Party over on our SCS Member Company Forum! We've got lots of fun planned, so be sure to drop in. Today the Verve Divas are previewing two more new sets over on the Verve Blog. These sets mark the return of our favorite little birdie, all decked out for a party. The sets are called Black Tie Birdies and Birthday Surprise and will be available at Midnight Eastern Tonight in the Verve store. There's a chance to win these two sets over on the Verve Blog today, so hop on over.

My preview card features the Birthday Surprise set and is for yet another challenge that can win you Verve Bucks! Bethany's our hostess this week for the Meet The Verve Diva challenge and her challenge is to use the Out of the Box technique. This is such a fun and easy technique that I often forget about, so I was excited to make a card for this challenge. Be sure to check out all the details and ask Bethany some get to know ya questions over in the Verve Forum.

I started by stamping the birdie in Memento Rich Cocoa on Classic Cream cardstock. I then used my Creative Memories Oval cutting system to cut an oval all around the birdie, except for the hat, which I then trimmed around with scissors. Y'all know how much I love party hats, so I was so excited to design this fun little party hat for Mr. Birdie. Aren't his tail feathers just fun? I colored him with Copic markers and then added a bunch of dot details with a brown marker, a few accents with my white gel pen and matted on a chocolate chip oval.

I also used the out of the box technique for the Birthday Surprise sentiment, cutting around the flourish that comes off the tail of the S. The cardstock is Gable Green and Cool Caribbean. I stamped the bottom half of the green galore with the square background from Grateful Elegance and then accented each diamond with Liquid pearls. I stamped the same background on the Cool Caribbean layer and then used the ticket corner punch for all the corners. The ribbon is 5/8" chocolate chip grosgrain, which I wrapped around the back of the card and then trimmed on either side of the Caribbean layer.

That's all for now. I hope to see y'all tonight at the release party. I announced the winners and included the slide show of all last week's mojo entries in the post below this one, so be sure to go take a peek.

Mojo Madness Winners & Slide Show

Congrats to September's Mojo Madness winners:

Lynda of Stamp Act with this mojolicious entry. This monochramatic black, white and shade of gray card is anything but boring. I love the way she used the border strip stamp from Grateful Elegance to depict the scalloped border in the sketch. This card is sophisticated and classy while still leaving you a hint of edgy trendiness. Just beautiful, Lynda!


Maggie of Stamps in Hallways with this adorable little bird card. The coloring, the cute little button embellishments and that big beautiful ribbon really caught my eye on this card. All the extra little details just seemed to say "mojo" to me.


Congrats Lynda and Maggie, email me your address and your choice of stamp sets and I'll get your prizes in the mail. Feel free to wait until tonight's release to make your decision. Thanks everyone for particpating. The judging was super hard. I even had to call in back up from Mr. Verve to narrow it down. He's got a pretty good sense of style. He married me, right? :)

Okay, before you go, be sure to check out all of the mojolicious entries in the slideshow below. I'll be back a little later with a super cute preview of one of the new sets.


NOTE: If you get a message that says no photos found, please hit the refresh button on your browser or the F5 function key on your keyboard, and hopefully it will reload with the pictures!


Mojo Monday Week #52

Happy Monday Everyone! I can't believe it's already time for another Mojo Monday sketch. This week's sketch is actually based on this card I made a few weeks ago. I liked the layout and wanted to give it another go, so I made it the sketch for this week. I hope you have fun with it!

To play along, just make a card using the provided sketch and leave a comment on this post with a link to a photo of your creation. There is no time limit - you can play any week at any time. If you happen to upload to SCS, please use keyword Mojo52 so we can see everyone's mojoliciousness all in one happy place.

It's also release week for Verve, and so today the Divas are previewing two of our new sets, Abundant Blessings and So Happy over on the Verve Blog. (Pssst - There's a prize - so you probably want to check it out!) These sets will be available on Wednesday, September 10.


I combined the two sets they're previewing today for my mojo sample this week and started by stamping the cattails image from Abundant Blessings on white cardstock three times in Memento Rich Cocoa ink. I then brayered the entire piece with Soft Sky ink for a nice background, and then used my white Signo gel pen to highlight each of the cattails for a frosty look. The two patterned papers are from the BasicGrey Offbeat paper collection. The sentiment is made up of two stamps from the So Happy set and stamped on a petite Nestibilities oval. Next I added a jumbo eyelet, wrapped the 1/4" chocolate chip grosgrain around the card and through the eyelet and tied in a little bow. I finished off with a little Stardust Stickles on the image for sparkle.

Okay, that's all for today folks. You've still got until noon today to get your Mojo entries in for last week's contest. Winners and the slide show of contest entries will be announced tomorrow. And don't miss out on the OSW challenge in the Verve forum where you can win the ENTIRE september release for participating.

A Sprinkling of Presents

Happy Saturday! It's time for another Saturday morning Our Creative Corner challenge, only starting this week I'm officially an OCC Girl! Woohoo!

This week's challenge is in honor of this month's hostess, the fabulous Amy Sheffer. She turns the big 4-0 this week, and her challenge is to make a humorous card to keep her laughing instead of crying. We'd love to have you play along. You'll find all the details, along with samples from the other OCC designers (Amy, Cindy, Dawn, Denise, Jennifer, Laurie, and Lynda), over on the Our Creative Corner blog.

My card uses stamps from the new You Say It's Your Birthday set by The Cat's Pajamas. I started by stamping Sprinkle with her present on an embossed and matted Classic Nestabilities Oval. I then colored her with Copics and added some black dots to the scallops. Next I inked up just the first part of the sentiment and stamped on the yellow-orange strip. I then inked up just the Again! part of the sentiment and stamped on white and placed below the horizontal panel as a little tab. To finish, I stamped the presents across the blue cardstock three times then colored with copics and a white gel pen. It was really a simple card to make, but I love how bold it is.

Hope you all have a fabulous weekend. If you're looking for some more weekend stamping fun, be sure to check out the OSW challenge over on the Verve forum. Several lucky winners will receive the new Verve sets that release next week, so be sure to give it a go before time runs out!

6 x 6 One Sheet Wonder Challenge

Well, today I promised a very special Verve challenge and here it is. It's a 6 x 6 one sheet wonder challenge to make four cards using one 6 x 6 sheet (plus coordinating cardstock), and you can download a printable PDF of the cutting template and four sketches --> HERE <--. If that doesn't work for you, I've also uploaded the template and sketches individually as photos in a special album in my SCS Gallery.

All the nitty gritty on the really cool prizes and the deadlines, rules, etc. can be found on --> THIS THREAD <-- in the Verve Forum. It's a limited time challenge, so be sure to check it out right away! Okay, there's lots of pics, so I won't bore you with all the details. I used Artful Elegance and two cards have a sneak peek at a new sentiment set called So Happy. The DP is American Crafts paper that is black and white on one side and silver on the other.


Hello Mr. Bright Side

I've just got a quick little card for you today and not a lot of chitchat. Lots to do and this is the first chance I've had to get to my computer.

This is another good layout for those artist trading cards (ATC's), as the image panel is 2.5" x 3.5". I used a long scallop rectangle (Nestabilities) for the black mat, and just cut the ends off to make it the length of the card. The papers are from the Junkitz Salsa collection. I stamped the butterfly from Fluttering By on classic cream and then again on the teal paper and paper pieced it, popping the wings up for some dimension. I added some green rhinestones to the paper and the butterfly's body for some sparkle, and then paper pierced the two corners of the image panel. The sentiment is also from Fluttering By and then I stamped the butterfly inside the card and colored with Copic markers. A really simple, but fun card.

Eat More Cake

Happy Tuesday! Today's card is another fun birthday card using new releases from The Cat's Pajamas. The You Say It's Your Birthday set I used includes the numbers 0 - 9 so you can personalize your birthday projects. I decided to use them as a little backdrop, so I randomly arranged the numbers 1 - 9 on an acrylic block, and then stamped a few times on my panel and colored with Copic markers. Next to it I stamped the cake on the cake stand, and to personalize the card, used the numbers 3 and 0 on either side of the cake stand. The cake is paper pieced from a piece of Cogsmo Collection paper from Cosmo Cricket. The other papers on the card are also from the Cogsmo line. For the sentiment panel I stamped the Birthdays are nature's way of telling us to eat more cake sentiment and then surrounded it with the fireworks looking stamp. I added photo corners made from a quarter of a circle and then added some red rhinestone bling. The background is embossed with the Swiss Dots Cuttlebug folder. The scallop edge is made with the Fiskars Threading Water border punch. I finished off with some thin black grosgrain ribbon and some Stardust Stickles on the cake.

Okay, this is a super busy week since the next Verve release is just a week away. Our release party will be next Tuesday, September 9 at 8PM Mountain (10 ET, 9 CT, 7 PT)! And I'll be posting a very special challenge you won't want to miss this Friday (Sept 5) on the Verve forum. There's a prize involved that will definitely be worth your while. And the Divas are still showing off their gorgeous pink & brown creations all week for the Verve Project Parade. Then on Monday we'll start our previews of the new Verve sets!

Mojo Monday Week #51 - Mojo Madness


Sorry this is so late everyone! I scheduled it to automatically post this morning, but put in the wrong date! OOPS!

Welcome to SEPTEMBER! That means it's already time for another Mojo Madness Contest! To participate, just make a card using this sketch and leave a comment on this post with a link to your project by Monday, September 8 at Noon Mountain Time (There's a clock on the sidebar with the official Poetic Artistry time). Once all the entries are in, I'll pick the TWO entries that I think are the mojo-est of them all. The two winners will be announced on Tuesday, September 9th and each will receive their choice of ANY Verve stamp set! Sound like fun? Well, let's get started! If you upload your cards to SCS, please use keyword Mojo51 (no space between Mojo and 51) so we can see them in one place. As always, you can use any stamps or products your heart desires.

My sample card uses more of the yummy new stamps The Cat's Pajamas just released. The stamps are from the Smells Like Cake set, and are just too much fun. I started by stamping my image and coloring it in with Copics. I decided I wanted a little more dimension, so I stamped the image again, outlined in gray and then trimmed out my colored cakes and popped them up on pop dots over the top. Next I stamped the Do I Smell Cake sentiment and the little sprinkles stamp all around the edges, coloring with markers here and there, and adding Stardust Stickles.

The top awning and the purple mat are both embossed with the Cuttlebug polka dot border embossing strip. I then just added some Stickles to each dot for even more sparkle. I stamped the border stamp from the set down the two sides of the card and then added a white satin bow. All patterned paper is from the BasicGrey Eva collection.

Okay, hope y'all enjoy this week's sketch. Have a happy Labor Day! Mark and I have been laboring all weekend, and still have a mile long to-do list!