Powered by Blogger.

Birthday Mojo

Happy Halloween!  It's time for another Mojo Monday sketch and this week is a round or square option.  I've been so busy lately and didn't have time to make a new sample for the sketch, so I thought I'd re-share the card that inspired this week's sketch.  Be sure to head on over to the Mojo Monday blog to see what the rest of the Mojo designers have done with the sketch.


Enabler's List:
Stamps: Making a Statement, Sunny Days (Verve Stamps)
Paper: Black, Daffodil Delight, Lucky Limeade (SU!), Blissful DP (Authentique), Cream
Ink: Jet Black Archival, Pumice Stone Distress (Ranger), Daffodil Delight (SU!), White Dye Ink (Memories), Copic markers
Accessories: Leafy Sprigs Die Set ,Loopy Blooms Die Set, Vintage Oval Die, Rounded Scallop Frame Die, Rounded Rectangle Die (A Cut Above by VERVE), Classic Circles Nestabilities (Spellbinders), paper crimper (Fiskars), Lemon Peel Stickles (Ranger), button, black pearls, Wide Striped ribbon (SU)

Love Gave Her Wings to Fly

Hi friends!  I'm back with another mixed-media project to share.  This one is an 8x10 canvas I made for an art journaling challenge, but missed the deadline so I never posted it.  The challenge was to incorporate a hand drawn girl on your project. I am definitely better with a mouse than with a pen or pencil when it comes to drawing, so this challenge scared me just a bit.


The concept for this piece came from thinking about my awesome husband.  He has truly given me wings to fly, and helped encourage and support me to achieve things I never even dreamed possible.  In times when I feel so desperately alone, he always knows just what to say to make me feel like I matter.  I am so blessed to have him in my life and I created this piece as a reminder of that.  I plan to frame it and hang it in my studio.

The girl was hand drawn on book paper, then I paper pieced a dress for her from some Glitz patterned paper.  You can't really tell in the photo, but there's actual black lace on the bottom of her dress, and I hand drew some scallops for a dainty little edging at the top and bottom of the dress.  I layered some hand drawn wings cut from a doily behind her, so that she could be flying, then cut some clouds from book paper using the TCP Cloud border CutUps.

The background of the canvas is done with Neo Watercolor II Crayons that I blended with a finger instead of using a wet paint brush.  I printed the Love gave her wings to fly words on copy paper, then sketched a heart around the love, colored with Gelatos and mod podged onto the canvas, placing some baker's twine under it for the balloon string.

I added a few sentiments from the Words of Wisdom sentiment to the clouds and background of the canvas.  A little texture was added using the scalloped frame and grid stamps from Making a Statement, the polka dots from Bountiful Backgrounds and a rub-on from Stampin' Up.

Okay, that's all for today.  I hope you've enjoyed the mixed-media projects I've shared this week.  Have a fabulous weekend!

Halloween Et Cetera

Hi friends!  Happy Thursday!  Today I've got a card to share using the new Boo to You set.  Before I left for Montana, I was straightening up my craft room and found some black Tiny Sweet Scallop cutouts hanging out on my desk next to the Boo to You set.  I thought they could work as little gravestones, so quickly sketched out my idea so I could return to it when I got home.


Last night, I finally found a little stamping time, and was happily surprised to see I already had an idea sketched out using the gravestones on a hill.  So I just went with it, pulling out some of the new paper and ribbon goodies I got on my trip.

The ghost image is stamped onto Et Cetera book print, then sponged with Brushed Corduroy ink and I highlighted their eyes with black Stickles.  The gravestones are cut with the Tiny Sweet Scallop Die Set and embossed in clear using the background from Wishful Elegance.  I tucked them behind a half circle to look like they're on a hill, then lined the circle with some gold cording.  The sentiment from Boo to You is stamped onto the frame from Tag Time, which I sponged around the edges, then lined with glue and Champagne glass glitter before matting with a black Curvy Bookplate die cut.  I finished with a little ribbon and a black heart spray, then aged the edges and turned down the top corner.

Thanks so much for stopping by today!  Have a fabulous day!  I'll be back tomorrow with another mixed-media project.

Enabler's List:
Stamps: Boo to You, Tag Time, Wishful Elegance (Verve Stamps)
Paper: Et Cetera (BoBunny), Black, Cream
Ink: Black, Brushed Corduroy (Ranger)
Accessories: Curvy Bookplate Die, Tiny Sweet Scallop Die Set (A Cut Above by Verve), Classic Circle Nestabilities (Spellbinders), ribbon, heart vine, chunky glass glitter, clear embossing powder, gold cording, black Stickles, black flatback pearls (Pizzazz Aplenty)

Everything Beautiful

Since I was off gallivanting with Tosh & Laurie last week, I am a bit behind on the stamping front, so I figured this week would be a good time to show a few mixed-media projects I've created over the past few months but haven't shared here.  I had intended to do more journaling and more posts with writing on the blog, but my life has been so overwhelming the past few months that I can't seem to find the energy to post anything but cards here.  Hopefully that will change, but for now that's what I've got to give.  {grin}

Today I'm sharing an altered project I made as a gift for a friend.  I bought the paper mache book box at Michael's, thinking I'd cover it with paper and tie it with a bow.  Something easy, ya know?  Then once I got it home, I just had this undeniable urge to paint, so paint I did... and I LOVE how it turned out!


I created this back in July, so I don't remember everything that went into it.  I started by covering the whole box with white Gesso, then adding paints in greens, aquas and blacks.  The butterfly with swirls up top is a Crafter's Workshop stencil, and I used a stampin' up wheel stamp for that bottom butterfly and the swirly stamping in the bottom left.  The sentiment is the Ecclesiastes 3:11 Plain Jane and is stamped in Archival Ink onto a tag, then mod podged on and painted over, addint a little texture by stencilling paint over some puncinella for the polka dots.  I added some rhinestone bling to set things off.


For the spine of the book I added more polka dots with black gesso, then added the Follow your heart rubon to the center.  However the heart portion of the text got smudged, so I painted over it and added a heart punch and some doodles.  The back is painted in similar colors.


Here's a side view of the box.  The cover pulls up to reveal a little box area to store stuff.  Love that it's pretty... and useful.  I left the inner portion just painted with white Gesso.  Most of the surface of the project is coated with a glossy Mod Podge to seal the paint in.

Okay, that's all for today!  Thanks so much for stopping by!

Flower Garden Mojo

Welcome to another Mojo Monday, friends!  This week's Mojo 212 sketch is a simple little CAS sketch.  Most of you know that clean & simple isn't usually my style (although I really admire those who can pull it off).  However, every once in a while I like to create something a little understated, and this seems like a perfect sketch for that.


The only stamping here is the sentiment from Small Phrases. My main image is from the SU! Flower Garden embossing folder, which I colored with Distress Stains, then added a bit of glue and some pink glass glitter to the flower centers to make them pop. The papers are from Authentique and I added a polka dot Cuttlebug folder to the whole base of the card front. The sentiment is stamped on an SU! word window punch and matted with the modern label punch, then tied on with some divine twine and accented with a resin rose, which I colored pink with Copics to match the card.

Thanks so much for stopping by today!  I hope you'll take some time to check out the designer samples over at Mojo Monday, then play along with this week's sketch!
 
Enabler's List:
Stamps:  Small Phrases (Verve Stamps)
Paper: Uncommon (Authentique), Crumb Cake (SU!), white
Ink: Vintage Photo, Antique Linen, Worn Lipstick, Spun Sugar distress ink and stains (Ranger), Copics
Accessories:  Word Window punch, Modern Label punch, Flower Garden Textured Impressions folder (SU!), baker's twine (Divine Twine), resin rose (Recollections), pink glass glitter (Melissa Frances)

Happy Haunting

Happy Friday!  I'm still on my little getaway with Tosh & Laurie, but I do have a little sample for this week's Viva la Verve! sketch to share with you.  Charmaine is this week's hostess and designer of this fun sketch, which I turned on its side.  I again used the new Boo to You set and some Halloween papers from years gone by.


I stamped the twin ghosties on a classic circle, then outlined with a stardust glitter pen and a blender pen.  You can't see the sparkle in the photo, but it's so super shiny in real life!  {grin}  I then masked off just the Boo portion of the boo to you sentiment and stamped it between the two ghosties.  The happy haunting sentiment is stamped onto copy paper, then run through the crimper and added to the card as a little sentiment flag.  A few little Candi paper embellishments are used for the circles and I covered them with orange peel stickles to make them shimmer.  I finished off with a curled corner and more polka dotted ribbon.

Enabler's List:
Stamps: Boo to You (Verve Stamps)
Paper: Halloween dp (Making Memories), Basic Black, Pumpkin Pie (SU!)
Ink: Jet Black Archival (Ranger)
Accessories: Classic Circles & Lacy Circles Nestabilities (Spellbinders), Candi paper embellishments, Orange Peel Stickles (Ranger), paper crimper (Fiskars), ribbon, liquid pearls (Ranger)

Trick or Treat

Hi friends!  Happy Wednesday!  I'm so excited to be headed off bright & early this morning to meet up with Tosh & Laurie for a fun little getaway!  I actually got a little extra stamping time last weekend, so I'll still have a few things to share with you while I'm gone.  {grin} This little number is another example using the Boo to You set.


I went for a simple layout, stamping the pumpkin from Boo to You on a rectangle, then doodling a little frame for it and adding a torn piece of dp for a photo corner.  The sentiment is stamped on a cream circle, then matted with a lacy circle and accented with silver liquid pearls and an orange rhinestone.  My curvy border is made using the Big Scallop CutUps from TCP, then I finished off with a double bow of polka dotted ribbon and a border punch for the bottom of the card.

Thanks so much for stopping by!  Have a fabulous day!


Enabler's List:
Stamps: Boo to You (Verve Stamps)
Paper: Toil & Trouble (The Girls Paperie), Pumpkin Pie, Black (SU!)
Ink: Jet Black Archival (Ranger), Copic markers, Spica glitter pens
Accessories: Classic & Lacy Circles Nestabilities (Spellbinders), Big Scallop CutUps (TCP), ribbon, rhinestones, silver liquid pearls (Ranger), border punch (SU!), Cuttlebug embossing folder

Boo to You

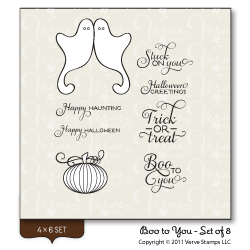
Hi friends!  Today I've got a brand new Verve set to share with you, called Boo to You.  I'm not typically a Halloween person, but I have several friends that really get into this holiday, so I finally gave in and designed a not-too-creepy Halloween set.  Unfortunately, design and manufacturing delays have pushed the release of this set late in the season.   We will be having a November release, but since this set is so late already, I decided to release it by itself.  We have a limited supply of Boo to You available on the website today with more arriving in the coming weeks, but we can't guarantee the re-stocking will be here in time for Halloween.  So if you've got to have it, grab it fast!  {grin}


For my card design, I went with the title sentiment and the twin ghosties image hanging over a tent card.  I {LOVED} this Toil & Trouble designer paper from The Girls' Paperie that came out last year, and even though I rarely make Halloween cards, I just had to have it!  I made a 1/2 accordian by cutting a strip of paper, punching one end with a decorative border, then scoring every 1/4".  For the sentiment piece I matted several sizes of circles on a lacy circles nestability, then added some liquid pearls to each connecting point.  The card is finished off with some of that wide striped ribbon from SU! that I just can't get enough of.

That's all on the card front today.  I'm getting ready to head out of town tomorrow to meet up with Tosh & Laurie for a fun-filled weekend.  But I've got some cards and posts pre-scheduled, so as long as blogger cooperates, there should still be some new eye candy over the next few days.  Thanks so much for stopping by!


Enabler's List:
Stamps: Boo to You (Verve Stamps)
Paper: Toil & Trouble (The Girls Paperie), Pumpkin Pie, Basic Black (SU!)
Ink: Jet Black Archival (Ranger), Spica glitter pen
Accessories: Classic Circles & Lacy Circles Nestabilities (Spellbinders), liquid pearls (Ranger), Scor-pal, wide ribbon (SU!)

Always On My Mind

Hi friend!  Happy Monday.  It's time for another Mojo Monday sketch and for my card I decided to participate in the Pink Critters Hope You Can Cling To challenge on SCS.


I thought it would be fun to put the bird from  Making a Statement, on the head of the elephant from To the Moon and pair it with the sentiment "you're always on my mind" from the Always on My Mind set.  It just makes me giggle thinking about that little birdie sitting on his head - always on his mind! {grin}  I embossed the scallop frame from Making a Statement in metallic bronze on black cardstock and cut with the Rounded Scallop Frame Die.  Some patterned paper and some ruffled ribbon finish things off.

I hope you have a fantastic day.  Be sure to stop by the Mojo Monday blog to check out the design team samples using this week's sketch.

Enabler's List:
Stamps:  Making a Statement, To the Moon, Always on My Mind (Verve Stamps)
Paper: Uncommon (Authentique), Hometown Summer (Pink Paislee), black, white
Ink: Pink Pirouette (SU!), Black
Accessories:  Rounded Scallop Frame Die (A Cut Above by VERVE), circle and photo corner punches (SU!), rhinestone, liquid pearls, ribbon

Dropping By

Happy Saturday, friends!  Today I've got a fun little card using some new goodies from The Cat's Pajamas.  This little bunny just called my name as soon as I saw him, and so when my order arrived I couldn't wait to ink him up and use this week's TCP Tuesday 180 sketch.


I started with the Away We Go papers from My Mind's Eye, Then decided it would be fun to have the parachute on the Big Ticket CutUps with the bunny hanging off.  I used the coordinating ticket frame from Admit One, then sponged the edges with Vintage Photo ink.  I then stamped the parachute image from Oh Chute, paper piecing the parachute the bow and the bunny, which I colored with Copic markers.  The sentiment is stamped onto the sentiment flag from the Easy Rosettes CutUps and I added some stars, rhinestones and a bit of linen thread to finish things off.

Thanks so much for stopping by!  Hope you have a fabulous weekend!

Enabler's List:
Stamps: Admit One, Oh Chute (The Cat's Pajamas)
Paper: Away We Go (My Mind's Eye), BasicGray (SU!), Natural White Classic Crest (Neenah)
Ink: Black Dye Ink (A Muse), Vintage Photo Distress (Ranger)
Accessories:  Big Ticket CutUps, Easy Rosettes CutUps (The Cat's Pajamas), Star Nestabilities (Spellbinders),  Small Star Punch (SU!), rhinestones, Ivory Linen Thread (The Cat's Pajamas)

Handmade Love

Hi friends!  It's Friday!  Woohoo!  That means it's time for another Viva la Verve! sketch.  This week's sketch is hosted by Maureen Plut.  I haven't had as much time to stamp as usual, so I decided to combine a few challenges into my VLV card as well.  First off, the Handmade Happiness Get Your Diva On challenge is going on and a $100 Gift Certificate to Verve is up for grabs, so you best get stamping!  Deadline is Sunday night!  The challenge is to use a handmade embellishment.  Here I chose a handmade rosette with a chipboard heart covered in glass glitter.  And that heart also makes this card work for the Brave Heart Hope You Can Clint To Challenge Teresa Kline is hosting to have at least one heart on your project.


I knew I wanted to make a rosette for my handmade embellishment, so I started using the Tim Holtz Paper Rosettes die, then cut a circle from a paper doily, inked with Victorian Velvet ink and made a little scroll strip to layer under my heart.  The heart is cut using the From the Heart Die Set and I ran it upside down through the Xyron, then covered with glass glitter for a fabulously shabby embellishment.  I thought this sentiment from Text Objects fit perfectly with the heart, so I added it to a circle die cut, then sponged with Victorian Velvet.  To tie things together, I stamped part of the coordinating sentiment background strip on the cream panel and distressed with inks and stains.  I used the wide ribbon for the two little tabs up top, then cut the ribbon in 1/2 to make a bow small enough to fit in the corner.  I finished off with a whole lot of distressed edges, using my Distrezz-it-all.

That's it from my stamping corner today.  I hope you have a fabulous weekend.  Here's a little updated photo of our new house... with exterior paint and stonework.  The garage doors still need to be painted, but things are starting to taking shape on the outside.  We've made all the interior selections, so now we're just waiting on things to happen.  {grin}


Enabler's List:
Stamps: Text Objects (Verve Stamps)
Paper: Shabby Chic Paper Stash (Tim Holtz), Early Espresso (SU!), Cream
Ink: Victorian Velvet and Vintage Photo Distress Inks, Antique Linen Distress Stain, Coffee Archival Ink (Ranger)
Accessories: From the Heart Die Set (A Cut Above by VERVE), Paper Rosette Die, Damask Texture Fades (Tim Holtz), Classic Circles Nestabilities (Spellbinders), wide striped ribbon (SU!), Distrezz-it-all (Zutter), Pink glass glitter (Melissa Frances)

Hometown Thanks

Hi friends!  I hope you had a fabulous weekend!  It's Monday again, and that means it's time for a new Mojo Monday sketch.  Today's sketch is based on this card I posted about a month ago.  I loved the way it turned out, and thought it would be fun to try again, so I turned it into a sketch and made a new card with it.


The Making Of:
I started by stamping the bookplate frame from Tag Time, cutting by hand and matting on a black Curvy Bookplate diecut.  The flowers are cut with the Floral Circles die set and then stamped with flower images from Bloom & Grow and sponged with blushing bride ink.  The leaves were cut with the Elegant Leaves die, then stamped with the coordinating leaves from Bloom & Grow.  A little patterned paper, a border punch, and ribbon and twine finished it off.

Thanks so much for stopping by today!  I hope you'll take some time to check out the designer samples over at Mojo Monday, then play along with us this week!

And before I go, just a little reminder about the Think Pink Sale going on at Verve through October 16.  10% of proceeds from the sale will be donated to the Susan G Komen For the Cure Foundation.

Enabler's List:
Stamps: Bloom & Grow, Tag Time (Verve Stamps)
Paper: Hometown Summer (Pink Paislee), Black, Cream
Ink: Regal Rose, Blushing Bride (SU!), Scattered Straw Distress, Jet Black Archival (Ranger), Copic marker
Accessories:  Curvy Bookplate Die, Floral Circles Die Set, Elegant Leaves Die (A Cut Above by VERVE), Embossed Curve Border Punch (EK Success), pink Divine Twine (TCP), button, pink frosted flatback pearls (Pizzazz Aplenty)

Sunny Days

Hi friends!  Happy Saturday!  Yesterday afternoon I got to sneak in a little stamping time.  I love stamping in the afternoons with the sun streaming in my window and was so excited to see that a little patch of sunshine had popped up amidst all the dreary rain we've been having.  Since I had sunshine on the brain, I thought this week's Color Throwdown #162 challenge was the perfect starting point.


The Making Of:
I began by arranging the cardstock colors:  pool party, barely banana, early espresso and crumb cake (I couldn't find any creamy caramel in my stash).  Then I knew I wanted to do the Have Only Paper Embellishments challenge in the Hope You Can Cling To forum.  I was in a coloring mood, so pulled out Maisy Ketto, stamped her in Stazon ink and then colored her.  The sparkly parts are painted with a mixture of re-inker, diamond glaze and glitter.  Hopefully that's not cheating... I consider it a type of ink since you paint it on.  {grin}  Either way, I'm sure whoever receives it at the MD Anderson Cancer Center will appreciate the bit of sparkle, so it's all good!  I added in some shadows around the image with a prismacolor pencil and gamsol, then matted on an oval and added the sentiment from  Sunny Days.

Thanks so much for stopping by today!  Have a bright, bright, sunshiny day!

Enabler's List:
Stamps: Maisy Ketto (Stamping Bella),  Sunny Days (Verve Stamps)
Paper: Barely Banana, Pool Party, Early Espresso, Crumb Cake (SU!), Cream
Ink: Black Stazon, pool party, barely banana (SU!), Vintage Photo (Ranger), Copic markers, re-inker/glitter glaze mixture, prismacolors & gamsol, liquid pearls
Accessories:  Classic & scallop ovals nestabilities (Spellbinders), Dotted Wave border punch (EK Success), swirl textured impressions (Sizzix), Scor-pal

Love is Long

Happy Friday!  Another Friday means it's time for another Viva la Verve sketch, and this week's fun circle in a square sketch is hostessed by Teresa Kline.   If you participate in all five of our VLV sketches for October, you'll be in a drawing to win a $100 gift certificate.  Pretty sweet!


The Making Of:
I had stamped and colored this flower from Abundant Blessings last week and it didn't fit my project, so I started with it in mind for the heart shape in the sketch.   For the sentiment, I masked off a portion of one of the text strips from Text Objects, so that just the Tennyson quote appeared, "Brief is life but love is long".  LOVE that.  The leaves from Sunny Days are stamped on patterned paper in Weathered Wood and then cut with the Leafy Sprigs Die Set.  All of the papers are from the original version of Lost and Found and I accented with a bit of lace, some Stickles for my flower center and a fun border punch for the bottom, highlighted with some bisque liquid pearls.

Thanks so much for stopping by today!  I hope you have a fabulous weekend!

Enabler's List:
Stamps:  Abundant Blessings, Sunny Days, Text Objects (Verve Stamps)
Paper:  Lost & Found (MME), Cream
Ink: Early Espresso (SU!), Vintage Photo (Ranger Distress), Copic markers
Accessories:  Leafy Sprigs Die Set (A Cut Above by VERVE), Classic Circles Nestabilities (Spellbinders), Loopy border punch (Martha Stewart), Red Stickles, Bisque Liquid Pearls (Ranger), vintage lace trim

Cute as a Button

Hi friends! It's Julee popping in on a very rainy Wednesday afternoon. We've had crazy weather this week, with 90 degree heat over the weekend and now it's wet and 50 degrees! So much for those sunny October afternoons I was bragging about earlier this week!  LOL  Anyhow, I was clearing off my desk for the first time in a while and I ran across this cute graphic-style card I made a while back and had never shared here.  It uses the Sunny Days set from our last release and a bit of washi tape.


The Making Of:
This was a really quick and simple card to make.  I stamped the leaves from Sunny Days on a square of white cardstock, drew a line for the stem and then stamped, hand trimmed and popped up the flower over the top.  The flower and leaves are colored with Copics and I accented with a button and some black scrapper's floss.  The sentiment from the same set is cut out with the Charming Banner Die Set.  Then it was just a matter of a few strips of washi tape, a couple buttons, some scored lines and a border punch and I was done.

That's it on the card front for today.  I haven't had a lot of stamping time lately because I've had a little something that looks like this on my mind....  meet our new house that should be finished up by early December.  The picture was taken on one of those fabulous sunny days this weekend.  We're sooooo looking forward to a bigger space for us and Verve!  I've been spending most waking minutes thinking about our interior selections and furniture arrangements.  I can't wait to see the finished house!  

Just a little reminder that the Verve sets and dies used today are part of our Think Pink Sale.  In honor of Breast Cancer Awareness, all in-stock stamps and dies are 20% off through October 16 - plus we're donating 10% of the sale proceeds to the Susan G Komen For the Cure foundation.  

And speaking of breast cancer awareness, Verve is also a proud sponsor of the Hope You Can Cling To challenges going on over on Splitcoast this month.  There's some serious prizes to be won if you play their daily challenges and send cards to the MD Anderson Cancer Center.  The cards will then be used by visitors on the breast cancer ward for patients and their families.


Enabler's List:

Stamps: Sunny Days (Verve)
Paper:
Lime Twist (My Mind's Eye)
Ink: Black, Copic markers, Stardust Glitter pen (Sakura)
Accessories: Charming Banner Die Set (A Cut Above by VERVE), Smash Tape, buttons, black scrapper's floss (Karen Foster), Scor-pal, Wavy Edge punch (EK Success)

Believe, Mojo, and a Blog Hop

Happy Monday!  It's October, which is my absolute favorite month of the year!  I like the warm afternoon sun and the chilly mornings and evenings... not to mention the glorious smells of pumpkin spice and apple cider in all the stores and eateries.  Such a heavenly time of year!  Anyway, it's the first Monday of the month and that means it's a Mojo Monday contest week!  Play along for a chance to win some Verve.  It's also time for our October Diva Inspirations Hop, so hop around and leave a little love on the Diva's beautiful inspirations (the full link list is below) for a chance to win some more VERVE!  Then pop over to the Verve website to check out our Think Pink sale.  In honor of breast cancer awareness month, we've got a 20% off sale, plus we're donating 10% of the proceeds from our sale to the Susan G Komen fund. A little something for you... a little something for the cure!  Sale ends October 16.


The Making Of:
I just love this simple layout, which you can keep fairly simple, or dress up with texture and embellishments.  Here I've kept the focus on some beautiful new patterned paper and a sentiment from the Believe set.  I dressed things up with a bit of sponging, an embossing folder, border punch and a bit of bling.  A few people asked how I made my double bows in my last post, and I'll let you in on my poser secret.  I usually just tie two bows separately, then glue down with a strong glue like Zip Dry to a flat piece of ribbon already adhered to the card.  It gives you the flexibility to get each bow just like you want it, without worrying about messing up the first one as you tie the second one on.  A ribbon like SU!'s seam binding ribbon ties beautifully, and is less bulky for gluing, so I prefer it for this type of ribbon treatment.


And here's the Diva Inspiration Master Hop ListHappy Hopping!
Diva Inspirations Blog Hop
Master Hop List
1. Julee10. Sankari
2. Betty11. Teresa
3. Dawn12. Andrea
4. Jen d.13. Tosh
5. Lynda14. Maureen
6. Shannan15. Amy
7. Sony16. Laurie
8. Susan17. Jen T.
9. Charmaine


We've hidden a little mystery prize on one of today's hop spots, so be sure to leave a little comment love as you hop around for a chance to win!

Comment Deadline: 11:59pm Mountain, October 10
Prize: $30 gift certificate to Verve

Enabler's List:
Stamps: Believe (Verve Stamps)
Paper: Generations (Simple Stories), Early Espresso (SU!), Cream
Ink: Early Espresso (SU!), Vintage Photo, Antique Linen (Ranger Distress)
Accessories: Classic & Scallop Circle Nestabilities (Spellbinders), seam binding ribbon, eyelet lace border punch (SU!), rhinestones, Herringbone embossing folder (Cuttlebug)

Happy World Card Making Day

Hi friends!  Happy Saturday!  It's World Card Making Day, which makes it the official start to the holiday card making season.  For my first  holiday card of the year, I decided to pull out my favorite set from last year's winter release... Merry Wishes.


The Making Of:
I started off with the Viva La Verve October Week 1 sketch in mind.  The prize up for grabs this month for participating in all of the October sketches is a $100 gift certificate to Verve!  Woohoo!  I've been wanting to use this gorgeous Lost & Found Christmas paper for a while, so I went with a classic Christmas design and tried to keep things pretty simple.  The berry sprigs are stamped around the circle, then colored with Copics and highlighted with a white gel pen.  A little shadow stamping along the right side with the solid berries completes the theme and I finished off with a double bow of seam binding.

I hope you're having a wonderful World Card Making Day and get a chance to ink something up!  Thanks so much for stopping by today!


Enabler's List:
Stamps: Merry Wishes (Verve Stamps)
Paper: Lost & Found Christmas (MME), brown paper bag (Paper Accents)
Ink: Cherry Cobbler, Early Espresso (SU!), Antique Linen, Vintage Photo (Ranger Distress), Copic Markers, Signo white gel pen
Accessories: Classic & Scallop Circle Nestabilities (Spellbinders), Wavy edge punch (EK Success), seam binding ribbon (SU!)